A Python Programming Roadmap for Structural Engineers
![[object Object]](/_next/image?url=%2Fimages%2Fauthors%2Fsean_carroll.png&w=256&q=75)
EngineeringSkills.com has grown over the years and now has a huge number of resources for engineers interested in Python. This tutorial is a convenient entry point and roadmap to these resources. It’s an attempt to draw them together in one place and give you a convenient starting point.
If you’re an engineer and you want to start exploring what Python can do for you, you’re in the right place! Read this tutorial and use it as a jumping-off point to the various Python-based engineering tutorials, projects and courses across this site.
Free Python Build-along projects
There are 4 short courses that I call Python Projects that you can start with. Each one focuses on a different engineering topic, but in each case, we’ll be using Python to build a simple tool based on some fundamental engineering principles. You can complete them in any order, but a sensible sequence would be:
- Building a Mohr’s Circle Calculator for Stress Analysis in Python
- Building a Shear Force and Bending Moment Diagram Calculator in Python
- Building a Beam Deflection Calculator
- Simulating Crowd-induced Vibrations using the Duhamel Integral
There is no difference in the coding complexity of any of the projects - after completing any of them you should be much more comfortable with the basics of programming in Python.
Using Engineering Libraries - Free Tutorials
As you'll see below, there are some really useful engineering-specific libraries available - one of my favourites is OpenSeesPy. If you want to learn how to use this library, here are two introductory tutorials to get you started:
- An Introduction to OpenSees and OpenSeesPy for 2D Truss Analysis
- Building a Parametric Frame Analysis Pipeline with OpenSeesPy and OpsVis
Engineering Courses that use Python
A large number of EngineeringSkills courses make extensive use of Python - usually because we’re building an analysis tool of some description. You can explore the courses here, but a good place to start would be:
- Fundamentals of Engineering Structural Dynamics with Python
- The Direct Stiffness Method for Truss Analysis with Python
- Beam and Frame Analysis using the Direct Stiffness Method in Python
Working through any of the resources listed above will leave you well-placed to independently start using Python in your own analyses and workflows
By the time you finish this article, you will…
- understand the potential that scripting in Python has to offer Civil and Structural engineers.
- have some ideas about how you can use it in your workflow.
- have written some Python code - at this point, you're officially a programmer!
- have setup your own local coding environment.
- be aware of really useful third-party libraries that you can use to speed up your development - some general and some really useful engineering-focused libraries.
- have plenty of options for further learning across EngineeringSkills.com.
Before we go any further, let me say, loud and clear, you don’t learn Python - nobody does! You use it, slowly at first with lots of Googling and ChatGPT-ing of error messages. But as you write more code, you’ll notice a growing degree of confidence and comfort. Eventually, you’ll find that the first tool you reach for is your code editor!
To say that you learn Python suggests that it’s a binary operation and that the world has two types of people - those that ‘know’ Python and those that don’t. This is not the case! By the time you complete this article, you will be a Python programmer, having taken your first steps along the path of growing competence and confidence!
Why use Python as a Civil or Structural Engineer?
The following doesn’t just apply to Civil and Structural engineers, you could apply it to any discipline that requires data processing, data visualisation, numerical analysis - pretty much any technical field. But since I’m mostly speaking to Civil and Structural engineers, I’ll tailor the discussion to those fields.
It’s not Excel
If you're an engineer of a certain vintage (I count myself in this group) you probably entered the working world and found yourself confronted with spreadsheets…spreadsheets everywhere! Spreadsheets for calculating everything from foundation bearing pressures to beam deflections to reinforcement arrangements in concrete sections.
At first glance, this seems to make sense - we’re varying the input parameters, automating a calculation and returning a result. A spreadsheet might seem like a good idea, and in the absence of any alternative, maybe spreadsheets are not a terrible solution. But they have some serious drawbacks.
Only the original author really knows what’s going on!
Unless you’re implementing a very basic calculation, spreadsheets can get very complicated very quickly. This often results in a scenario where the original author is the only person who truly understands how the sheet works and what assumptions and simplifications are baked in. This is a huge problem in a production environment with many users, not least because the template spreadsheets often hang around a lot longer than their original authors!
Ever find yourself asking why a certain spreadsheet does something, only to be told that the engineer who wrote it doesn’t work here anymore? I certainly have and while this problem isn’t unique to spreadsheets - their often cryptic nature exacerbates it!
Non-linear workflow
A spreadsheet is a canvas - there is no imposed linear structure or flow to the calculation. We might logically decide to lay out our calculation in a linear flow from top to bottom, but we don’t have to.
This freedom is not a good thing! It can introduce ambiguity where a poorly structured spreadsheet requires the author to hunt around for the relationships between cells. Code can also suffer from poor structure - but I’d argue the naturally linear nature makes this less of a problem.
They lack any real ability to narrate or document your thinking
There are often many ways to complete a calculation or analysis. Some calculations follow a very prescriptive process, but some require the engineer to develop the analysis as they go.
An ability to more clearly document your thinking is a particular strength of Jupyter Notebooks (I’ll explain what these are shortly - for now just think of them as a file we write Python in). A good scripted analysis, written in Python should make the author’s logic and thought process clear to the end-user. While this isn’t impossible in a spreadsheet, it’s a messier and more tedious process - meaning it’s less likely to happen.
Poor readability - the logic is hidden
Excel has the ability to implement complex logic. Pretty much any logical structure that you can implement in Python can also be done in Excel. The issue you’ll face is readability - in Excel all of your formula’s are generally locked inside of a small formula window.
This makes investigating how a value is calculated difficult and inconvenient. In contrast, code is much easier to decipher because it’s more human-readable, you can parse it, in a more natural way, line by line.
Even Microsoft wants to use Python in Excel!
Even Microsoft recognise the power of Python scripting. They’ve recently introduced a form of Python scripting directly inside Excel. More detail can be found here.
However, if you’ve reached the point where you’re trying to shoe horn Python directly into a spreadsheet, I’d suggest, you need to take a step back and ask, why not just ditch the spreadsheet and move direct to Python scripting in a coding environment!
One caveat is if you’re constrained to use a spreadsheet by your organisation or need to integrate somehow with a pre-existing spreadsheet-based workflow. If this is your situation, you have my sympathies :)
It’s flexible - if you can write, you can write Python
Python scripting offers you the flexibility to build whatever type of data processing pipeline you like. You’re not constrained to adopt the conventions or assumptions of any other software tool.
You design exactly the type of process or analysis you need for the job at hand. If you can write the steps of the process in English (or whatever language you natively speak), you’re more than halfway towards writing the script!
It unlocks your computer’s best attribute - speed!
Python, like any programming language, is simply a way to write instructions for your computer. In this way, it gives you the ability to unleash the speed and efficiency of your computer on whatever task you like;
- Need to import 10,000 datapoints from a field test and process them before exporting in another file format - a simple script will do this in the blink of an eye.
- Need to setup an automation that pulls data from a remote sensor and logs it or processes it - a simple Python script can easily accomplish this.
- Need to interact programmatically with another software package or platform - there’s a good chance it has a Python API (application programming interface) that will allow you to interact with it programmatically.
It’s extensible - there’s a library for almost everything
Perhaps one of the biggest strengths of the Python ecosystem is the number of third-party libraries that exist.
A library is a collection of pre-written code that you can use to perform many tasks without having to write the code from scratch yourself.
Because Python has been used extensively by the engineering and scientific community for decades, there is a wealth of excellent libraries that we can use to speed up our scripting. Some are very general-purpose while some are written specifically to solve domain specific problems - we’ll take a look at examples of both later in this tutorial.
Write your first Python code or script
Hopefully at this point you’re curious enough to continue exploring Python - so let’s get down to writing some code! For now, we won’t worry about the details of setting up Python on your local computer (we’ll get to that later) - the immediate objective is simply to get you writing code!
Also don’t worry about trying to memorise data types or how to implement various logical structures like loops and conditional statements - you’ll get bogged down in the weeds. The best strategy I’ve found to learn any new programming language is to just build something and work out how to solve problems as you hit them.
Where to write your code
You can code along with these examples in our online Python environment. I suggest splitting your screen and opening this tutorial on one side and the online Python environment on the other.
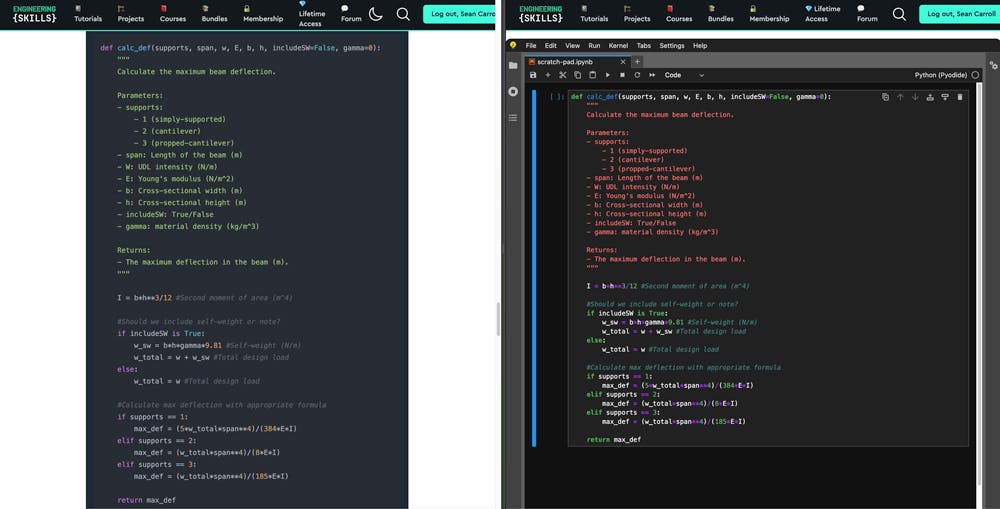
Fig 1. - You can code along with the example in this tutorial here. Split your screen and open this tutorial on one side (left above) and the online Python environment on the other (right above).
The environment you’ll be writing in is called a Jupyter Notebook - don’t worry about that for now, I’ll explain it in more detail later, for now we’re just concentrating on writing some code.
A simple Python script to get started with
A typical engineering activity involves taking in some new information, processing it and returning an output - this is also exactly what a Python function does. We can think of a function as a block of code that takes in arguments (input parameters), does something with them (processes them) and returns an output or result.
Every function has a name that can be used to call or invoke it. When we call a function, we can specify different input parameters each time. It will always perform the same processing actions and return a result based on the parameters passed in.
To get us started, let’s say we want to calculate the maximum deflection in a beam that is subject to a uniformly distributed load. Our result will depend on the load magnitude, the support conditions, material properties and dimensions of the beam and its cross-section.
Let’s start by defining a function that accepts the relevant input parameters:
- the support conditions - we’ll use an integer to indicate three possible arrangements
- 1 for simply supported
- 2 for cantilever
- 3 for propped cantilever
- The span between supports
- The uniformly distributed load intensity
- Young’s modulus for the material
- The cross-section width
- The cross-section height
- A True or False (Boolean value) to indicate whether we’re including self-weight (we’ll allow False as a default value)
- A material density (we’ll default this to zero)
We can define the function as follows:
def calc_def(supports, span, W, E, b, h, includeSW=False, gamma=0):

	#Calculations to work out deflection will go here...

	max_def = 0 #Until we've calculated it, just set deflection to zero

	return max_def #return the value for deflection (currently zero!)
Examine the anatomy of the function definition; there are a couple of important features:
- We start a function definition with the
defkeyword, followed by the function name,calc_defand then a set of parentheses that contain all of the parameters orargumentswe can pass into the function when we call it later. - Note the colon at the end of this first line. This says that everything below, that is indented, is part of the function definition.
- Lines that start with a
#, are comments and will be ignored when the code runs. - Next, we’re defining a variable called
max_defand temporarily assigning it the value of zero. - The final thing we need to do is return some value out of the bottom of our function. In this case, it makes sense to return the calculated value of deflection.
...write out the required steps to complete this task. Don’t worry about writing Python code - just write out the logical steps required to complete the task - it will make the code easier to understand and interpret when you see it.
This is a great habit to get into before you start any coding task - I still do this before ever writing a line of code on a new project.
This is how my outline goes;
- I’ll need to calculate the second moment of area, regardless of the support conditions or loading - so I would start there.
- Next I’d like to calculate the design load; for this I will need some branching logic to handle the cases when self-weight is and is not included - I’ll use an
if/elsecondition for this. - Then, I can use the relevant formula to determine the maximum deflection based on which of the three boundary conditions were passed in by the user. For this, I’ll use another branching logic statement,
if/elif/elif.
For reference here are the formulas we’ll use to calculate the maximum deflection for each of the three support conditions:
- Simply supported beam:
- Cantilever beam:
- Propped cantilever beam:
Now, let’s take a look at the complete code. You should be able to piece together what’s happening based on the game plan outlined above.
You may still have questions about some of the finer points - don’t worry!
The objective of this example is only to give you a high-level idea of one type of task we can easily accomplish with code. You’ll cover the details as you work through more in-depth tutorials I’ll point you to later.
def calc_def(supports, span, w, E, b, h, includeSW=False, gamma=0):
    """
    Calculate the maximum beam deflection.

    Parameters:
    - supports:
        - 1 (simply-supported)
        - 2 (cantilever)
        - 3 (propped-cantilever)
    - span: Length of the beam (m)
    - W: UDL intensity (N/m)
    - E: Young's modulus (N/m^2)
    - b: Cross-sectional width (m)
    - h: Cross-sectional height (m)
    - includeSW: True/False
    - gamma: material density (kg/m^3)

    Returns:
    - The maximum deflection in the beam (m).
    """

    I = b*h**3/12 #Second moment of area (m^4)

    #Should we include self-weight or note?
    if includeSW is True:
        w_sw = b*h*gamma*9.81 #Self-weight (N/m)
        w_total = w + w_sw #Total design load
    else:
        w_total = w #Total design load

    #Calculate max deflection with appropriate formula
    if supports == 1:
        max_def = (5*w_total*span**4)/(384*E*I)
    elif supports == 2:
        max_def = (w_total*span**4)/(8*E*I)
    elif supports == 3:
        max_def = (w_total*span**4)/(185*E*I)

    return max_def
Note that all of the text at the top of the function between the “““ is actually a multi-line comment and will be ignored when the code runs. It’s only there to help future users (including you) understand how the function works.
Copy this code into the code box in the Python environment I directed you to earlier. You can run the code by clicking the ‘Play’ button at the top of the screen - see the image below.
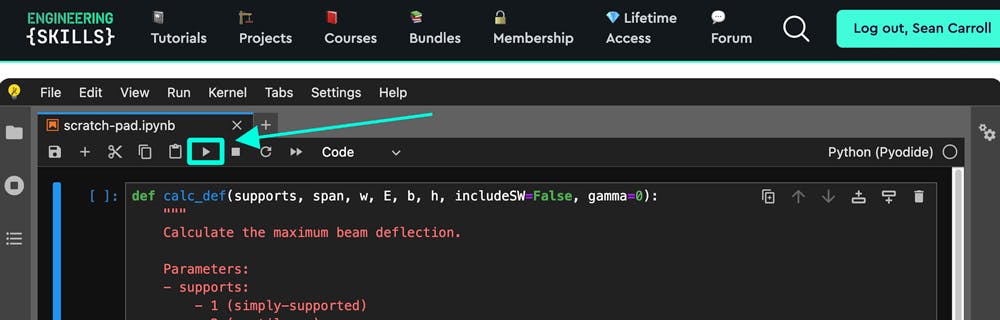
Play button to run the code in the online Python environment.
By clicking the play button you’ve defined the function - now we need to call it and pass in some actual parameter values for the function to operate on.
In the next code block, copy and paste the following code and then execute this cell.
d = calc_def(1, 8, 50*10**3, 200*10**9, 0.1, 0.3, False, 150)
print(f'The maximum simply supported beam deflection is {round(d,3)} m')
Here’s what’s happening:
- In the first line, we call the function and pass in a specific set of parameters. We assign what gets returned from the function to a new variable,
d. - The second line is optional - we’re telling Python to print a line of text (a
string), and add in the value ofdinto the line of text. To keep the text clean and tidy, we’re using an inbuilt Python function to round the number to 3 decimal places asdlikely contains many more decimal places by default.
After executing this cell, you should see the following output printed directly below the code cell:
The maximum simply supported beam deflection is 0.059 m
Congratulations, you’re now a programmer! It’s just a matter of making incremental improvements from here, one step at a time.
Now, the fun begins - play around with this function, change the values or extend the function in whatever way you like. Why not try and tackle a completely different calculation by writing a new function?
The key to making sustained progress with your programming is to learn by doing. Just keep looking for opportunities to flex the muscle. I’ll point out plenty of resources that will help you do this before the end of this tutorial
Setting up your own Python playground
Writing and running code in your browser is great for getting started, but if you’re going to be regularly working with Python, you’ll want to set up a development environment on your local computer. We’ll discuss that next.
There are two routes you can take when it comes to writing Python code:
- You can write your code in text or ‘script’ files. These files have the extension
.pyand are usually written in a code editor like VS Code or a similar application. When you execute the script file, all of the code contained in that file will run. - Alternatively, you could write your code in a Jupyter Notebook - these are files with the extension
.ipynbthat we've referenced already. The function we wrote for calculating beam deflection was written in a Jupyter Notebook! The Python code that you write in these files is exactly the same as the code you write in a script file. The difference is that working in a Jupyter Notebook gives us a lot of additional options over raw script files.
For the type of work you’ll likely find yourself doing, data manipulation, data analysis, and scripting engineering analyses, I overwhelmingly prefer working with Jupyter Notebooks, and this is where I recommend you start. Jupyter Notebooks have a lot of really helpful features, most notably…
- We can execute code in isolated cells rather than executing the entire file in one go - this makes it easier to build up your code by testing stages of your analysis and confirming you’re happy with the output before proceeding.
- We can write markdown text (including Latex for math) in between code cells. This is incredibly helpful when you want to document your work as you proceed.
- Data visualisations (plots) are produced within the body of the Notebook.
These features mean that a Jupyter Notebook isn’t just raw Python code; rather, it allows you to present your analysis as a ‘story’ containing Python code, data visualisations, and nicely typeset text to narrate or document your work. This type of presentation lends itself beautifully to engineering analyses!
So, how do you get Jupyter Notebooks running on your computer? Fortunately, I’ve recorded a full video walkthrough of the setup process. You can watch that below. Just follow the steps along with me, and you’ll be up and running in no time!
This video walkthrough is an extract from The Direct Stiffness Method for Truss Analysis with Python course.
You can actually combine Jupyter Notebooks and Python script files in the same workflow. This works great when you have functions you re-use regularly. You can write these ‘library functions’ in a script file and then import and use them in your Jupyter Notebooks. This helps keep your Notebooks clean and streamlined. Keep this in mind and test it out as you get more comfortable working with Python.
Jupyter Lab
In the video walkthrough above, we’re getting set up to work on individual Jupyter Notebooks in the standalone notebook environment. But there is a better way to work with your Jupyter Notebooks! Jupyter Lab is a development environment specifically built to work with Jupyter Notebooks - you can think of Jupyter Lab as an IDE (integrated development environment) within which you can view and work on your Jupyter Notebooks.
I’ve explained exactly why I like working on my Notebooks in Jupyter Lab, as well as some of the nice features of Jupyter Lab in the video below. Once you’ve set up Jupyter Notebooks on your local computer by following the previous video, watch the one below to get Jupyter Lab up and running.
VSCode, another extremely popular IDE, also has excellent support for working with Jupyter Notebooks and is a great alternative to Jupyter Lab. Personally, I still prefer working on Notebooks in Jupyter Lab, despite using VSCode for all of my other non-Python coding. Once you’re over the initial learning curve and are comfortable working in Jupyter Lab you should experiment with VSCode - you may prefer it!
-
We can write Python code in raw text or script files with the extension ‘.py’.
-
We can write Python code in Jupyter Notebooks - these have the file extension
.ipynband have nice additional features over raw script files. -
We can view, edit and run Jupyter Notebooks in the standalone Jupyter Notebook environment (what we did in the first video tutorial).
-
We can also view, edit and run our Jupyter Notebooks in a specialised development environment called Jupyter Lab (second video) - this is what I recommend you do!
-
VSCode is another development environment (IDE) that has good support for working with Jupyter Notebooks.
Learn to love third-party Python libraries
One of the great strengths of working with code - in any language - is the ability it gives us to work with other people’s code and re-use that code in our own work. We do this through the use of libraries. A library is simply code that has been written by someone else and packaged up for us to conveniently use within our Python code.
Many of the common tasks we need to do in code are so common that libraries have been written to handle these tasks. This saves us a huge amount of time! Common libraries you’ll find yourself include:
- math: this contains many mathematical operations that we routinely use in engineering analysis. I import this into almost every file I start.
- Numpy: this is a library that makes working with matrix data very easy. It contains a huge number of helpful functions and is particularly helpful if you’re already familiar with Matlab. I also use Numpy in almost every script I write.
- Pandas: this is similar to Numpy but I would argue it has richer features for data exploration and manipulation. Pandas is particularly useful for data exploration and analysis.
- Matplotlib: this is probably the largest and most widely used general-purpose data visualisation library in Python. If you want to generate a plot of your data, Matplotlib is likely the easiest library to do this with. Many other data visualisation libraries in Python are actually built on top of Matplotlib. This is another library I use extensively.
- SciPy: this library is a general-purpose scientific and mathematical analysis library. It’s fantastic for working with symbolic math in particular.
These are just a handful of very commonly used Python libraries. As you write more code and turn your attention to solving new problems with Python, you’ll come across many more, and eventually, you’ll have compiled your own list of go-to libraries. Exploring new libraries is one of the little pleasures of working in code!
As you work through the learning resources listed below - you’ll see plenty of examples of these and other libraries in use.
Civil and Structural Engineering Python Libraries
The Python libraries we have discussed so far are what we might consider general-purpose libraries. They perform operations that are common across disciplines. But there are also many discipline-specific libraries, and this is where working with libraries gets really exciting. Regardless of the industry you’re in, if it has a need for technical or numerical analysis, there are almost certainly at least a handful of libraries that you can explore to help speed up your scripting.
In the discipline of civil and structural engineering for example, we have a number of libraries that help us with everything from finite element analysis (OpenSeesPy, PyNite, AnaStruct) to cross-section analysis (SectionProperties, ConcreteProperties). Again, there are more out there - these are just a selection!
Python learning resources
At this point…
- you’ve written some Python code and can hopefully see there’s no mystery to it.
- you’ve set up a Python environment locally on your computer.
- and you’re aware that there are helpful pre-written packages of code called libraries that we can use to help us perform complex operations.
Now it’s time to start working through some learning resources and start getting the reps in to build your confidence! I’ve always believed that the best way to learn how to code is to build something useful - so that’s where you should start.
Free Python Build-along projects
There are 4 short courses that I call Python Projects that you can start with. Each one focuses on a different engineering topic, but in each case, we’ll be using Python to build a simple tool based on some fundamental engineering principles. You can complete them in any order, but a sensible sequence would be:
- Building a Mohr’s Circle Calculator for Stress Analysis in Python
- Building a Shear Force and Bending Moment Diagram Calculator in Python
- Building a Beam Deflection Calculator
- Simulating Crowd-induced Vibrations using the Duhamel Integral
There is no difference in the coding complexity of any of the projects - after completing any of them you should be much more comfortable with the basics of programming in Python.
Using Engineering Libraries - Free Tutorials
I’ve mentioned that there are some really useful engineering-specific libraries available - one of my favourites is OpenSeesPy. If you want to learn how to use this library, here are two introductory tutorials:
- An Introduction to OpenSees and OpenSeesPy for 2D Truss Analysis
- Building a Parametric Frame Analysis Pipeline with OpenSeesPy and OpsVis
We’ll be publishing more tutorials on how to use various engineering analysis libraries, so make sure to subscribe to our newsletter to get notified when we publish a new one!
Engineering Courses that use Python
A large number of EngineeringSkills courses make extensive use of Python - usually because we’re building an analysis tool of some description. You can explore the courses here, but a good place to start would be:
- Fundamentals of Engineering Structural Dynamics with Python
- The Direct Stiffness Method for Truss Analysis with Python
- Beam and Frame Analysis using the Direct Stiffness Method in Python
Working through any of the resources listed above will leave you well-placed to independently start using Python in your own analyses and workflows
Conclusion
As I said at the outset of this article, I don’t believe there is any such thing as ‘mastering Python’ or reaching a stage where you can say you’ve finished learning how to code! We’re all just on different stages of a journey, growing in confidence and competence with every step. If you’ve read this far…you’ve taken your first steps - and the most difficult ones - you’ve started! The trick now, is to keep going.
So, whenever an opportunity presents itself to write a little script to perform some analysis or automate a repetitive calculation, jump at the opportunity. This is where the most effective learning happens—when you’re solving your own problems.
Sure, tutorials and build-along projects are great to get you started and familiar with the basics, but you’ll really start to think like a programmer when you start sketching out solutions to your own problems - then turning these sketches into code. So, get after it!
That’s all for this one, I’ll see you in the next one.
Dr Seán Carroll's latest courses.
Featured Tutorials and Guides
If you found this tutorial helpful, you might enjoy some of these other tutorials.
Structural Analysis and Stability – Symmetrical Structures
An introduction to common lateral stability structural schemes with numerical examples

Dr Seán Carroll

Steel Truss Design to Eurocode 3
Learn how to design one of the most common structural forms - the steel truss

Callum Wilson

Plate Girder Design to Eurocode 3
A step-by-step guide to the design of code-compliant steel plate girders.
Callum Wilson