A Pynite Crash Course - Analysis of Shell Structures
![[object Object]](/_next/image?url=%2Fimages%2Fauthors%2Fdan_ki.png&w=256&q=75)

Welcome to part 3 in our series exploring the Pynite FEA library. We're picking up right where we left off in part 2 and expanding our analysis to structures that resist both in-plane and out-of-plane actions.
Before we continue, just a quick note on terminology; we're using the term shell here due to the presence of both out-of-plane bending moments and in-plane forces. Although none of our case studies explore curved surfaces, the techniques we'll cover are applicable to both flat shells (like a shear wall) and curved shells (like a dome, for example).
We covered all of the relevant background theory in that previous tutorial, so if you haven’t read that, I’d suggest starting there before moving on to this tutorial. This tutorial also assumes some familiarity with the Pynite API, which you’ll develop in part 2.
Tutorial breakdown
📍 1.0 Example 1: Shear Wall Analysis - Shell Elements in Action
We pick up right where we left off by diving into our first shell example, the analysis of a shear wall - a classic, yet relatively simple example of a plate-like structure whose primary action is in-plane force.
📍 2.0 Example 2 - Shear Core with Openings
In the second example, we expand from a single wall to a full shear core with openings. This exercise surfaces some of Pynite’s limitations and the workarounds that we can implement to overcome them.
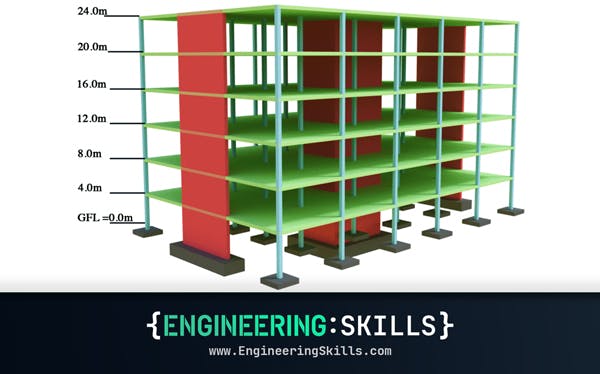
📍 3.0 Example 3: Three-story Frame Analysis
In the third and final example, Dan combines both column and plate elements to model a multi-story frame structure with floor slabs. This is a great example of combining various structural elements to create a more comprehensive model.
Although the structure in this example is relatively simple, you can apply this modelling approach to much more complex structures. In fact, a great exercise would be to combine the modelling techniques from examples 1 and 2 to build a complete vertical and lateral load-resisting model.
After completing these three examples and the three plate examples from part 2, you will have an excellent understanding of how Pynite works and how you can use it to perform quite complex finite element analyses.
📍 4.0 How does Pynite stack up against commercial software?
In section 4, Dan presents a breakdown of how Pynite compares against much larger, feature-rich commercial software packages. This is an excellent and honest appraisal of Pynite’s strengths and weaknesses.
📍 5.0 Conclusions and Final Thoughts
Finally, we wrap up with Dan’s final conclusions. Having an experienced structural engineer do a deep-dive on Pynite and offer his honest conclusions on its utility in a modern commercial engineering setting is incredibly helpful and worth paying attention to!
📂 Make sure to download the Jupyter Notebook (linked above) to run locally as you read through the tutorial.

1.0 Example 1: Shear Wall Analysis - Shell Elements in Action
Let's explore shell elements by analysing a concrete shear wall under lateral loading. This demonstrates in-plane force behaviour rather than out-of-plane bending. Note that this example does not include effects of cracking.
For the examples in this tutorial, I'll keep the running commentary fairly minimal since the code is all pretty self-explanatory and we spent quite a bit of time explaining the code in part 2.
We can kick off my initialising the model and defining the main parameters.
# =============================================================================
# Define Model
# =============================================================================
model = FEModel3D()

material = "Concrete"
fpc = 6.0 # concrete strength, f'c, in ksi
nu = 0.2  # Poisson's ratio
E = 57000 * (fpc * 1000)**0.5 / 1000  # Young's modulus in ksi
G = E / (2 * (1 + nu))  # Shear modulus in ksi
rho = 0.15 / (12**3)  # density in kci

model.add_material(material, E, G, nu, rho)

t = 8  # thickness of wall in inches
mesh_size = 12  # inches

# Wall dimensions
wall_width = 10 * 12   # 10 feet in inches
wall_height = 20 * 12  # 20 feet in inches

print(f"Dimensions (W x H x t): {wall_width/12:.0f}' x {wall_height/12:.0f}' x {t}\"")
Engineering tutorials,
written by an engineer — not a model.
Read the rest, download the resources and unlock the full archive. This is independent, human-crafted engineering content. An Essentials Membership gets you access to all member-only tutorials and helps keep the lights on for a learning platform built by engineers, for engineers.
Essentials Membership
- Instant access to the full archive
- 28-day refund, no questions
- Cancel anytime
- Your card and subscription are handled by Stripe
Already a member? Log in
Featured Tutorials and Guides
If you found this tutorial helpful, you might enjoy some of these other tutorials.
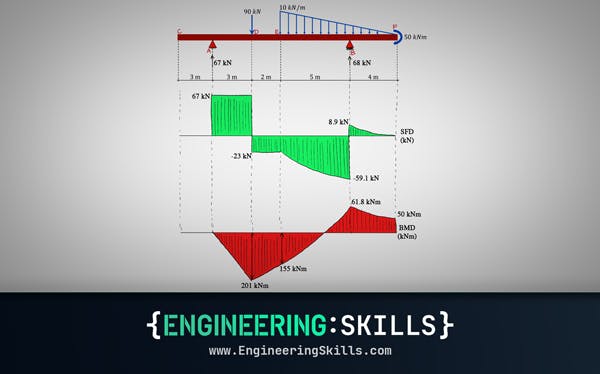
Shear and Moment Diagrams – An Ultimate Guide
[Updated] A thorough introduction to shear forces, bending moments and how to draw shear and moment diagrams with worked examples.

Dr Seán Carroll
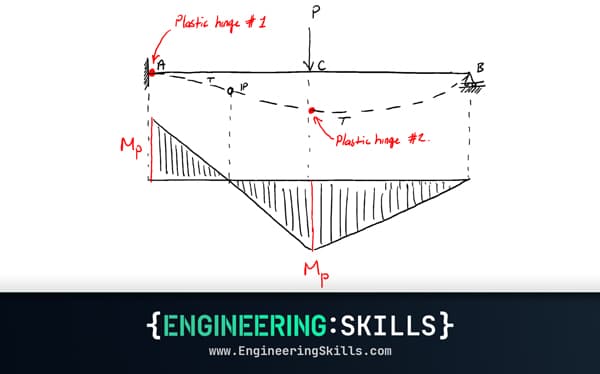
Yielding, Plastic Deformation and Moment Redistribution in Beams (2/2)
Learn how calculate plastic moment capacities and how moment redistribution occurs in a structure
Dr Seán Carroll
Structural Analysis and Stability – Symmetrical Structures
An introduction to common lateral stability structural schemes with numerical examples
Dr Seán Carroll