Finite Element Analysis of Plate and Shell Structures: Part 1 - Plates
An analysis pipeline for thick and thin plate structures, a roadmap from theory to toolbox
- You will understand how the Reissner-Mindlin formulation enables us to accurately capture both thin and thick plate behaviour, and the key advantages it offers over Kirchhoff plate theory.
- You will understand how to turn your understanding of the fundamental mechanics of plate behaviour into a custom finite element solver written in Python.
- You will have developed versatile and powerful meshing workflows that utilise the powerful open-source meshing engine, GMSH, to create meshes to pass into your solver.
- In addition to using your own custom finite element code, you will be comfortable validating your results using OpenSeesPy and Pynite, two of the most widely used open-source finite element analysis libraries.
Analytical techniques are great for modelling the simplified behaviour of plate and shell structures, but we quickly run into their limitations when we stray beyond the limiting geometry or assumptions that the models are built upon.
This is where finite element modelling comes into its own. In this course, we’ll cover the finite element modelling of plate structures by building our own solver based on the incredibly versatile Reissner-Mindlin theory. This approach will allow us to model both thick and thin plate elements, resulting in an extremely versatile and accurate analysis pipeline.

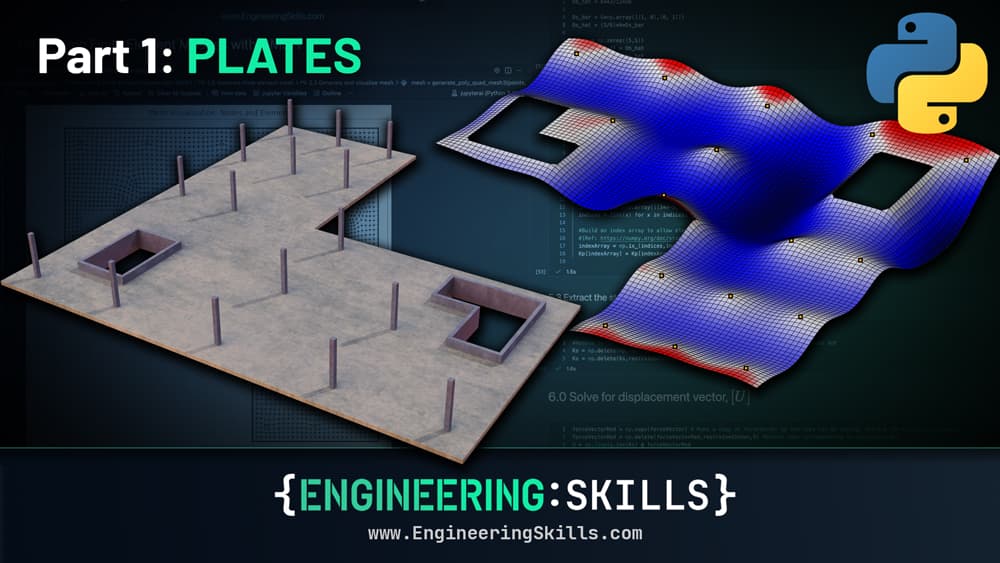
Custom mesh generation and finite element analysis of a floor slab using our custom finite element solver.
Building your own solver will give you a much deeper understanding of the underlying theory. That said, we’ll also cover how to implement the same solutions using OpenSeesPy and Pynite - two free and open-source Python libraries.
To complete our modelling and analysis toolkit, we’ll also cover mesh generation using a procedural workflow that uses GMSH, an incredibly powerful open-source meshing library.
Once you’ve completed this course, you’ll have a complete workflow for the analysis of plate structures, backed by a fundamental understanding of the Reissner-Mindlin theory that powers it all! You'll also be ready to expand your knowledge to shell structures in the next course in this series.
Course Breakdown
Section 1: Welcome and Setting the Scene
In section one, we outline the course’s main objectives and address housekeeping topics such as how to get help and support and what background knowledge would be beneficial. We’ll also cover a high-level introduction to Reissner–Mindlin theory and discuss why it’s at the heart of the course. Section one is recommended for all course participants.
Section 2: The Mechanics of Plate Elements
In section 2, we begin to dig into the core mechanics. We’ll work through Reissner-Mindlin plate theory and build up the core equations required to establish the element stiffness matrix - the fundamental building block of our solver. If you’re not concerned with the underlying mechanics, you can skip this section and move straight into section 3.
Section 3: Virtual Work and Calculating the Element Stiffness Matrix
In section 3, we’ll initially focus on how the principle of virtual work leads us to the equations for the element stiffness matrix and equivalent force vector for the element. From here, we briefly review the Gauss quadrature numerical integration technique used to calculate the stiffness matrix and force vector.
With the theoretical development complete, we’ll turn our attention to Python implementation and focus on how to actually compute the stiffness matrix and equivalent force vector. Lectures 17 to 20 are recommended for anyone who wants to implement the custom FEM solver in the next section.
Section 4: Expanding to a Full Plate Element Solver
In section 4, we take what we implemented on a single element level in the previous section and expand it to build a solver for a rectangular plate consisting of multiple elements. This is our first big coding section where we implement a complete plate solver from scratch.
Section 5: Benchmarking against OpenSeesPy and Pynite
In section 5, we validate the output from our custom analysis against equivalent structural models built with both OpenSeesPy and Pynite. Validating our code against these open-source libraries is critical at this early stage and will allow us to move forward with more confidence in our work. It will also surface a phenomenon known as shear-locking, which we’ll need to tackle to ensure the accuracy of our custom solver.

Comparing the output from our custom solver to OpenSeesPy, Pynite and Navier's solution for thin plates.
Section 6: Meshing with GMSH and Python
So far, all of our plate analysis has been on rectangular plates that consist of rectangular elements. Practically, we’ll need to be able to analyse plates of all shapes and sizes consisting of non-rectangular or quadrilateral elements.
To do this, we’ll need a more sophisticated method of generating finite element meshes. This can be quite a complex pre-process step, so to help us out here, we’ll introduce GMSH, another open-source library, in section 6. Our aim in this section is to build the pre-processing meshing step that we can build into our analysis pipeline.

Custom finite element mesh generated using GMSH.
Section 7: Custom Mesh Finite Element Analysis
In section 7, we'll use our new meshing functionality from the previous section to build a custom finite element mesh that much more closely resembles a real world slab. We will then modify our solver code to directly process this mesh.
We'll analyse the structure using our custom solver and again validate this result against an OpenSeesPy solution. This is going to throw up an interesting side-effect of our earlier attempts to eliminate shear-locking using selective integration!
Section 8: Eliminating Zero-Energy Displacements
In the previous section, we saw that our attempts to eliminate shear-locking by using selective integration revealed another interesting problem, zero-energy displacements or zero-energy mechanisms. So, for our Reissner-Mindlin element to be truly effective we need a strategy to eliminate this behaviour.
In this final section, we'll explore a popular approach to do just that, using assumed transverse shear strain fields. Once implemented, we'll have a robust and versatile Reissner-Mindlin element, validated through comparison with an equivalent OpenSeesPy solution. This leaves you in an excellent position to expand your knowledge and skills in the next course in this series, where we focus on shell structures.

Custom mesh finite element analysis - displacement map free from shear-locking and zero-energy displacements.
Who is this course for?
- Engineers and student engineers that want to build a deeper understanding of the mechanics of plate structures.
- Engineers that want to leverage the power of Python and in particular open-source tools for complex structural analysis.
- Anyone who has completed Finite Element Analysis of Continuum Structures in Python and wants to expand on what was covered in that course.

Download your personalised Certificate of Completion once you’ve finished all course lectures.
Applying for jobs? Use your Certificate of Completion to show prospective employers what you’ve been doing to improve your capabilities.
Independently completing an online course is an achievement. Let people know about it by posting your Certificate of Completion on your Linkedin profile or workplace CPD portfolio.