Getting Started with Parametric Design in Grasshopper
![[object Object]](/_next/image?url=%2Fimages%2Fauthors%2Fdan_ki.png&w=256&q=75)
In this tutorial, Dan Ki provides the introduction I wish I had when I first started exploring Grasshopper. It's concise, practical and most importantly, it's focused on how Grasshopper can be useful for structural engineers - no abstract forms or high-brow concept architecture, just some practical parametric framing to get us started.
Tutorial breakdown
📍 1.0 Parametric Modelling
We start with a basic definition of parametric modelling.
📍 2.0 Grasshopper Basics
Then we move on to cover some of the basic components and concepts that you'll need to know to get started using Grasshopper.
📍 3.0 A Simple Example - Steel Building
After reviewing the basic building blocks, we see how these can be used to create a simple steel frame building. Make sure to download the Grasshopper file and explore the example for yourself. By digging around in the example file, you'll get a much better understanding of how the model comes together.
📍 4.0 A Note on Optimisation
Next, we'll briefly cover optimisation and flag some common pitfalls that you'll want to avoid.
📍 5.0 Expanding Capabilities With Plugins
One of the huge advantages of Grasshopper is the ability to use plugins to extend the functionality of the software. In this section, we'll cover some of the most popular plugins that can be useful for structural engineers.
📍 6.0 Best Practices
Probably the most important part of the tutorial - in this section, Dan covers some of the best practices for working in Grasshopper and maintaining manageable Grasshopper files.
📍 7.0 What Next?
Finally, we wrap up with some suggestions for what to do next in your journey with Grasshopper.
📂 Make sure to download the Grasshopper file (linked above) to explore as you read through the tutorial.

By now, most engineers have heard about Grasshopper. If you've been curious about it or always wanted to dive in but didn't know where to start, this tutorial is for you! We'll clarify not only what Grasshopper is, but also why and when you'd actually want to use it.
When I first started learning Grasshopper, I remember sifting through a plethora of tutorials online and YouTube videos showing cool twisty towers and neat looking Voronoi patterns applied to various surfaces. But as a structural engineer, I kept wondering, "what good is any of this to me?" If you are in the same boat, rest assured, this tutorial won't follow that path. Instead, I'm writing the primer I wish I'd had - a structural engineer's guide to Grasshopper, focused on practical applications and an actionable roadmap from day one.
We will use Rhino 8, but everything covered here is backwards-compatible with Rhino 7.
1.0 Parametric Modelling
Before we open Grasshopper, let's establish what parametric modelling actually means. The core principle is simple: if your calculations depend on variable parameters, you're creating a parametric model.
The simplest parametric model? A spreadsheet. Set it up once, change the inputs, and the calculations update automatically. If you've ever built a spreadsheet to design a concrete beam or calculate wind loads, congratulations - you're already a parametric modeller! I've even seen spreadsheets perform truss analysis - impressive, but seems a bit like cutting down a tree with a Swiss army knife: technically feasible, but not quite the right tool. But I digress...
We start with this broad concept because understanding parametric thinking transfers across tools - whether you're working in a spreadsheet, Python, or Grasshopper.
2.0 Grasshopper Basics
Grasshopper differs from a traditional spreadsheet in two key ways. First, the logic is visible - no hidden formulas buried in cells. When done well, the business logic flows clearly across your canvas. Second, and more obviously, Grasshopper connects to Rhino's powerful CAD engine, enabling complex geometric operations that would be tedious or impossible to do manually.
Let's open it up and see what we're working with. In Rhino's command line (at the top), type Grasshopper or click the Grasshopper icon in the toolbar. You'll see a blank canvas with a ribbon of tabs at the top.
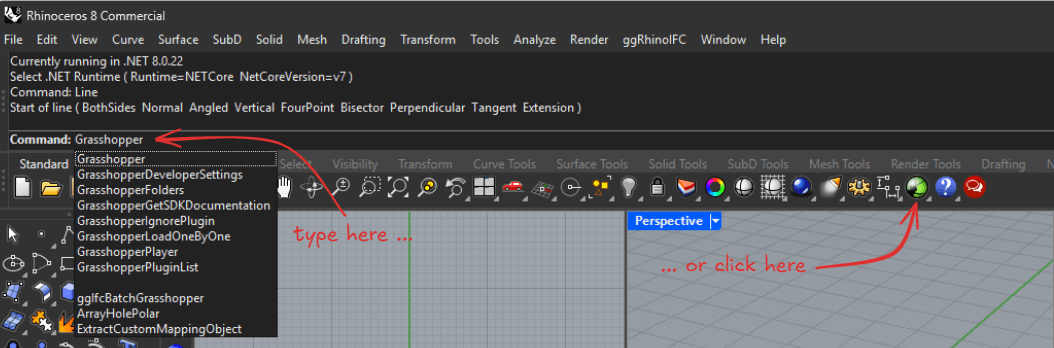
Fig 1. Opening Grasshopper from the Rhino user interface.
…and more. Don't be overwhelmed or worry about memorising what's where! Grasshopper organises components logically, and you'll develop an intuition for navigation with time. You can also double-click the canvas and type the name of the component directly - after a while, this will feel like second nature!
2.1 Primitives
Let's start with the Params tab, where you'll find Grasshopper's basic building blocks. Like any programming language, you have your ints, floats, and bools. But you also get geometric primitives - Lines, Curves, Breps - which function as the digital analogues to our beams, columns, and shells. These geometric types are what move the needle for structural work.
Here's what you'll use most often:
-
Number- Your floats and integers. Need a beam length? A load magnitude? A material property? Start here. -
Integer- Whole numbers, useful for counts, divisions, or indexing into lists. -
Boolean- True/False values that drive conditional logic. Think of these as your "if this, then that" switches. Also very useful in conjunction with cull patterns and masks. -
Point- A location in 3D space (X, Y, Z coordinates). The foundation of all geometry. -
Vector- A direction and magnitude. Essential for offsets, normals, and directional operations (remember your dot and cross products? 🤓). -
Plane- A coordinate system with an origin and an orientation. Critical for positioning geometry consistently.
These may seem trivial, but understanding how data flows through Grasshopper starts here. When you place a Number slider on your canvas and connect it to a component, you're establishing a parametric relationship. Change the slider, and everything downstream updates automagically.
Each component has inputs on the left and outputs on the right. Hover over an input or output to see its name and expected data type. Some inputs have default values (shown when nothing is connected), while others are required. Learn to read the component tooltips as you'd read a function's docstrings - they'll save you countless headaches.
2.2 Lines and Curves
This is where things get interesting for us structural engineers. Lines and curves form the backbone of 1D structural elements - your beams, columns, braces, and cables.
The most straightforward way to create a line is with the Line component (found under Curve -> Primitive). Feed it two points, and you've got yourself a line. Simple enough, but here's where Grasshopper starts to flex its muscles: you can generate points procedurally using the Range or Series components, create grids with Rectangular, and suddenly, you're not just drawing a beam - you're generating an entire structural grid!
For more complex geometry, curves become invaluable. The Interpolate component creates a smooth curve through a series of points - perfect for representing curved beams or approximating structural shapes. The Arc component (3-point or SED variants) lets you define circular segments, useful for arched structures or understanding cable geometries under load.
Here's a practical scenario: say you're modelling a series of moment frames with varying bay widths. Instead of manually drawing each frame, you can
-
Define the column base points using a series, range, or even a panel with distances.
-
Create vertical lines for columns (can use
Line SDL: start point, direction, length). -
Generate beam lines by connecting column top points.
Adjust your input parameters, and the entire frame updates. This is parametric modelling in action - and it beats re-drawing in AutoCAD every single time.
A few components worth befriending early:
-
Divide Curve- Split a curve into equal segments. Essential for meshing or applying nodal loads. -
Evaluate Curve- Extract points, tangents, and normals at any parameter along a curve. -
Join Curves- Combine multiple curve segments into a single curve (when continuity allows) -
Offset Curve- Create parallel curves at a specified distance. Think offset gridlines or generating parallel framing. -
Polyline + Explode- If you have a line of points, simply draw a polyline through them and explode! Et voila, you have individual lines connecting your points!
2.3 Breps
After familiarising yourself with lines and curves, we ascend to higher dimensions - 2D and 3D geometry. "Brep" (I pronounce them "bee-rep", but I've also heard some pronounce them "brep", as spelt) stands for "Boundary Representation" - it's Rhino's way of describing 3D surfaces and solids. For structural engineers, breps are how we represent slabs, walls, shells, and any other surface-based elements (prior to meshing, of course).
The most common entry point is the Boundary Surface component, which creates a surface from a closed curve boundary. Feed it a rectangular curve, and you've got a slab or wall. But breps can be far more sophisticated than that - they can represent complex doubly-curved shells, folded plates, or irregular floor geometries. We won't cover curved surfaces here, but it's good to know that it's possible should the need arise.
Here are some workhorse components:
-
Extrudetakes a curve and pushes it along a vector. For example, a line in the XY Plane extruded in the Z direction gives you a wall. -
Loft- Create a surface between two or more curves. Perfect for generating transition pieces or complex geometries. -
Brep Edges- Extract the edge curves from a brep. Useful when you need to work with the boundaries of existing surfaces. -
Evaluate Surface- Similar toEvaluate Curve, but for surfaces. Extract points, normals, and tangent planes at any UV coordinate. -
Divide Surface- Split a surface into a grid of points. This is your gateway to meshing for FEA or generating support points.
One important distinction: in Grasshopper, a brep can be an open surface (like a thin shell element) or a closed solid (like a brick element). Understanding this distinction matters when you start doing geometric operations like boolean unions or intersections. Most structural elements will be open breps - you're representing the mid-surface, not the actual thickness.
2.4 Data Structures
Great, so now we know what we can build with - lines, curves, and surfaces. But if primitives are individual structural members, data structures are your framing plans - they define how those members connect and organise into a coherent system. Let's talk about how these elements are organised. Just like in any programming language, these primitives are organised in data structures. In Grasshopper, we have items, lists, and trees.
This is where Grasshopper separates itself from traditional CAD. Understanding data structures is fundamental to working efficiently in Grasshopper. Miss this concept, and you'll spend hours troubleshooting why your components aren't behaving as expected. Get it, and you'll unlock Grasshopper's true power.
Items
Items are singular pieces of data - one number, one point, one curve. Simple enough.
Lists
Lists are ordered collections of items, indexed starting at 0. Lists are incredibly useful because Grasshopper components naturally operate on them item-by-item. Feed a list of five points and a vector into a Move component, and you'll get five moved points. No loops required - it's implicit.
Some essential list operations:
-
List Item- Extract a specific item by index (0 is first, -1 is last - just like in Python). -
List Length- Returns the length of the list. -
Cull Pattern- Remove items based on a repeating boolean mask (e.g. keep every other item). -
Weave- Interleave two lists together. -
Shift List- Rotate items in a list (useful for creating member connectivity)
Trees
Trees are where things start branching out 😉. A data tree is a hierarchical structure where each branch is a list. I like to think of it like a file system: the tree is your hard drive, branches are folders, and items are files. Trees use path notation like {0;0}, {0;1}, {1;0;0} to identify branches.
Why do we need trees? Because structural models are inherently hierarchical. You might have multiple floors, each floor has multiple frames, each frame has multiple members. A tree allows you to maintain that organisation.
Here's a concrete example: imagine you're creating a multi-story building with three bays. You want to generate all the columns. If you create three columns per floor and four floors, a list would give you 12 columns all mixed together. But with a tree, you can organise them as {0} -> first floor columns, {1} -> second floor columns, etc. Now you can easily manipulate or query columns by floor.
Key tree components:
-
Graft- Convert a flat list into its own branch (list -> tree) -
Flatten- Collapse all branches into a single, flat list (tree -> list) -
Tree Statistics- Analyse tree structure (branch count, max branch length, etc) -
Param Viewer- A viewer for your data structure. Double click to toggle between textual and visual presentations. -
Path Mapper- (Advanced) Reorganise tree structure using pattern-based rules (syntax akin to regex)
Here's the thing about trees: they're powerful but can be confusing at first. I would advise you to start with lists, and only introduce trees when you actually need that hierarchical organisation. The idea is to pay attention and be intentional about your data structures. When you're debugging, use a Panel and Param Viewer components to visualise your data structure - it'll show you whether you have an item, list, or tree, and what the structure looks like.
The implicit looping I mentioned earlier? That's Grasshopper's killer feature. When you feed lists into components, Grasshopper automatically matches items by index. If the list lengths don't match, it uses the longest list and repeats the shorter one. Understanding this behaviour is critical - it's how you can generate 100 beams with the same cross-section by feeding in 100 lines and a single section property.
3.0 A Simple Example - Steel Building
You might wonder why we're jumping to an example without covering more components. This is intentional and follows a philosophy of learning by doing. It is one thing to read about how to ride a bicycle, but quite another to actually get on and pedal.
Additionally, there are so many components that it simply would not make sense to go through them one by one. When learning anything new, focus on learning concepts instead of memorising facts. So in that light, what I've outlined are some of the most common primitive building blocks - now let's see how they work together.
For those with programming experience, I suggest embracing idiomatic Grasshopper practices rather than forcing familiar paradigms. In Python, you'd write a for-loop to create ten beams. In Grasshopper, you generate a list of ten lines and let implicit iteration handle the rest. It feels weird at first, but once it clicks, you'll find it's often more intuitive than explicit loops. Think of it like learning a new natural language - you could translate English to Korean word-by-word, but you'd sound like a robot. True fluency comes from thinking in the target language. The same applies here.
The following example ties together the concepts we've covered: primitives, lines, surfaces, and data structures. Connecting Grasshopper to structural analysis software (like Karamba3D, SAP2000, or Pynite) is beyond the scope of this primer, but once you're comfortable with these fundamentals, that's a natural next step.
In order to keep this tutorial backwards-compatible with Rhino 7, we introduce one plugin (Elefront) to help bake our geometry to Rhino with structural metadata.
In the Rhino command line, type PackageManager, and install the latest version of Elefront. You will need to restart Rhino once it’s installed.
Head on over to the provided "R8_Grasshopper Primer.gh" file to follow along! Download it from the resources section at the top of this page.

Fig 2. The Grasshopper file you can use to follow along - download above.
By default, I have turned the preview on for all components. You should see everything at once. Double-click the "Perspective" tab to expand it.
Navigating in Rhino in 5 minutes (tl;dr):
-
Right-click + drag to rotate
-
Shift + Right-click + drag to pan
-
Scroll to zoom
Everything you generate in Grasshopper is visible in the Rhino viewport as red and green for selected items (I've selected the columns from the example and the Sphere from the "Basics" section).
To turn everything off, simply select all items on the Grasshopper canvas (click and drag), hit the middle button, then click "Disable Preview". Now the Rhino viewport should be empty.
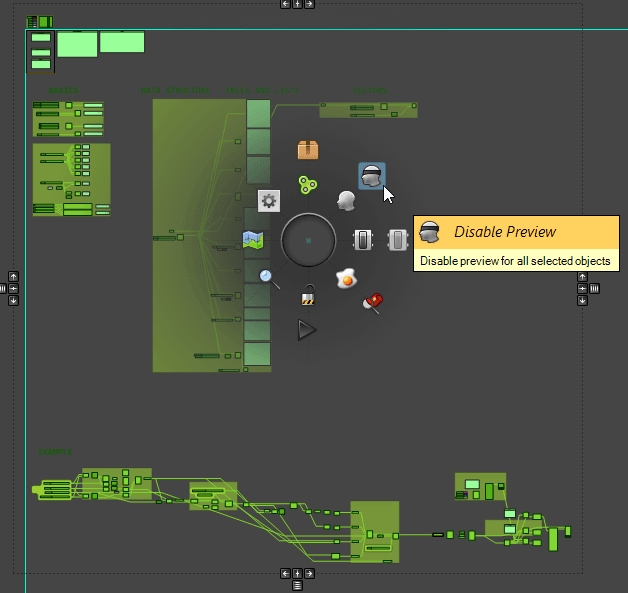
Fig 3. Disabling preview in the Rhino viewport.
From here, you have two options:
- Select just the components you want to see, then enable preview on just those items (or Ctrl + Q).
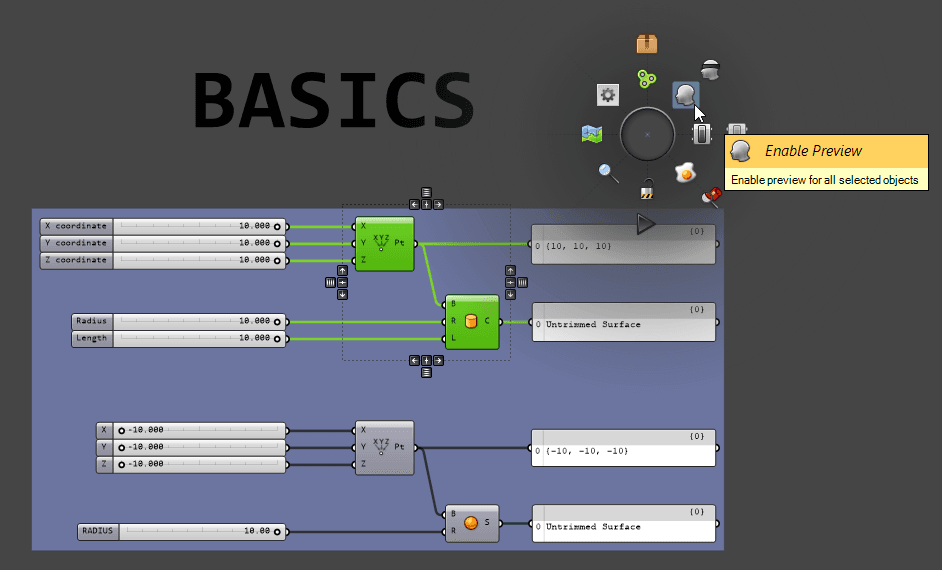
Fig 4. Enabling preview on selected items.
- Or hit the "Only draw preview geometry for selected objects" button on the top right corner of the canvas. Now, only selected items will be visible in the Rhino viewport. I tend to favour option 1, but both have their time and place. See what feels right to you.
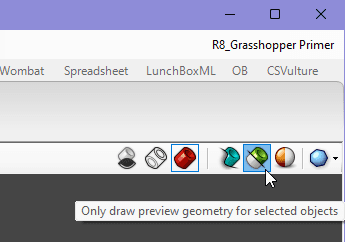
Fig 5. Previewing selected items using the draw preview geometry menu button.
Now, spend a few minutes playing with and studying the "BASICS", "DATA STRUCTURES - TREES AND LISTS", AND "VECTORS" sections at the top. Once you have a handle on it, move on to the example! The video below provides a quick run-through of the example model (no sound). Take your time and pick apart this example model - you'll get so much more out of this exercise, as opposed to reading about how it all works.
4.0 A Note on Optimisation
Grasshopper includes a built-in evolutionary optimisation engine called Galapagos (found under Params -> Util). While a full dive into optimisation is beyond our scope today, it's worth knowing it exists.
The basic concept: you define a "fitness" function (what you're trying to minimise or maximise - say, tonnages or cost), specify which parameters can vary (beam depths, spacing, etc), and let Galapagos iterate through thousands of combinations to (hopefully) find the optimal solution.
For structural engineers, this could mean:
-
Minimising weight while satisfying deflection limits
-
Finding the most efficient truss configuration
A word of caution: optimisation is powerful but can be misused. You're only optimising what you tell it to optimise.
Too few constraints?
You'll get mathematically optimal but physically nonsensical results - like a 0.5" deep beam because you forgot to set the deflection limit.
Too many constraints?
You'll over-constrain the problem and find either no feasible solution or only trivial ones that didn't need optimisation in the first place.
Too many variables?
The solution space becomes too vast, and convergence isn't guaranteed - Galapagos might run for hours without finding the actual optimum. Worse, because it's an evolutionary algorithm, different runs can produce different results - you're finding an optimum (local or global), not necessarily the global maximum.
The sweet spot is generally 2-5 key variables with constraints that truly matter. Use your engineering judgement!
For further reading, see here.
5.0 Expanding Capabilities With Plugins
Grasshopper's ecosystem is vast, with hundreds of plugins extending its functionality. While we've focused on out-of-the-box capabilities in this tutorial, it's worth knowing what's out there. Think of plugins as specialised tools for your workshop - you don't need them all, but a few, well-chosen ones can dramatically improve your workflow.
5.1 Karamba3D
Karamba3D is probably the most well-known structural analysis plugin for Grasshopper. It's a parametric FEA engine that integrates seamlessly with Grasshopper's workflow and is my go-to. Great for form-finding, optimisation, and preliminary design studies. There's a free version with limitations and a paid professional version. Currently, cross-section optimisation is only implemented for Eurocode 3, but an AISC implementation is in the works, and hopefully ACI soon after!
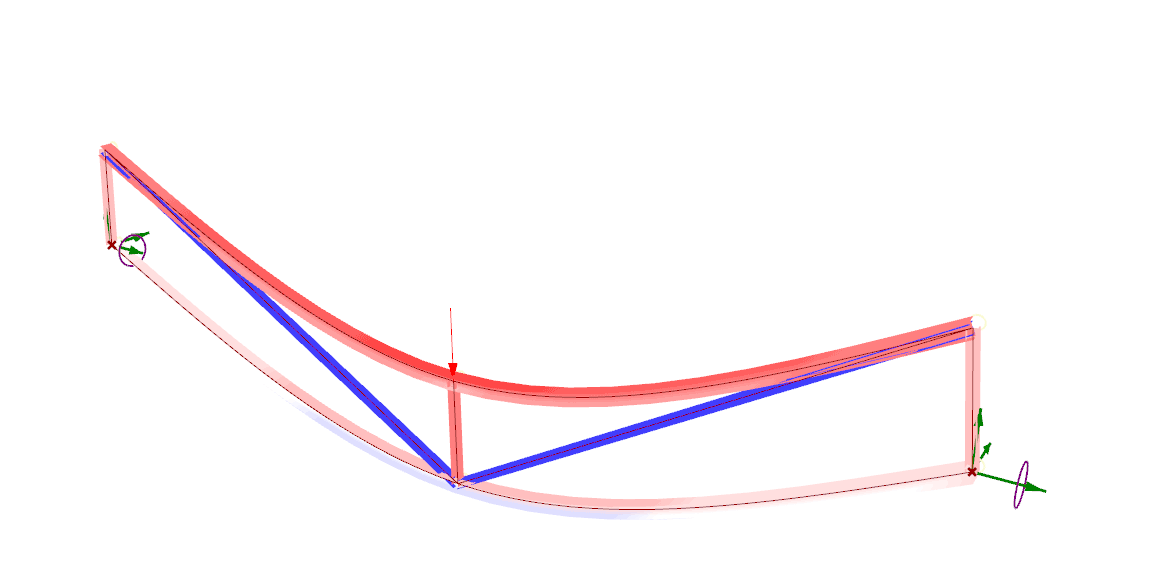
Fig 6. Parametric truss analysis using Karamba3D [Karamba3D website].
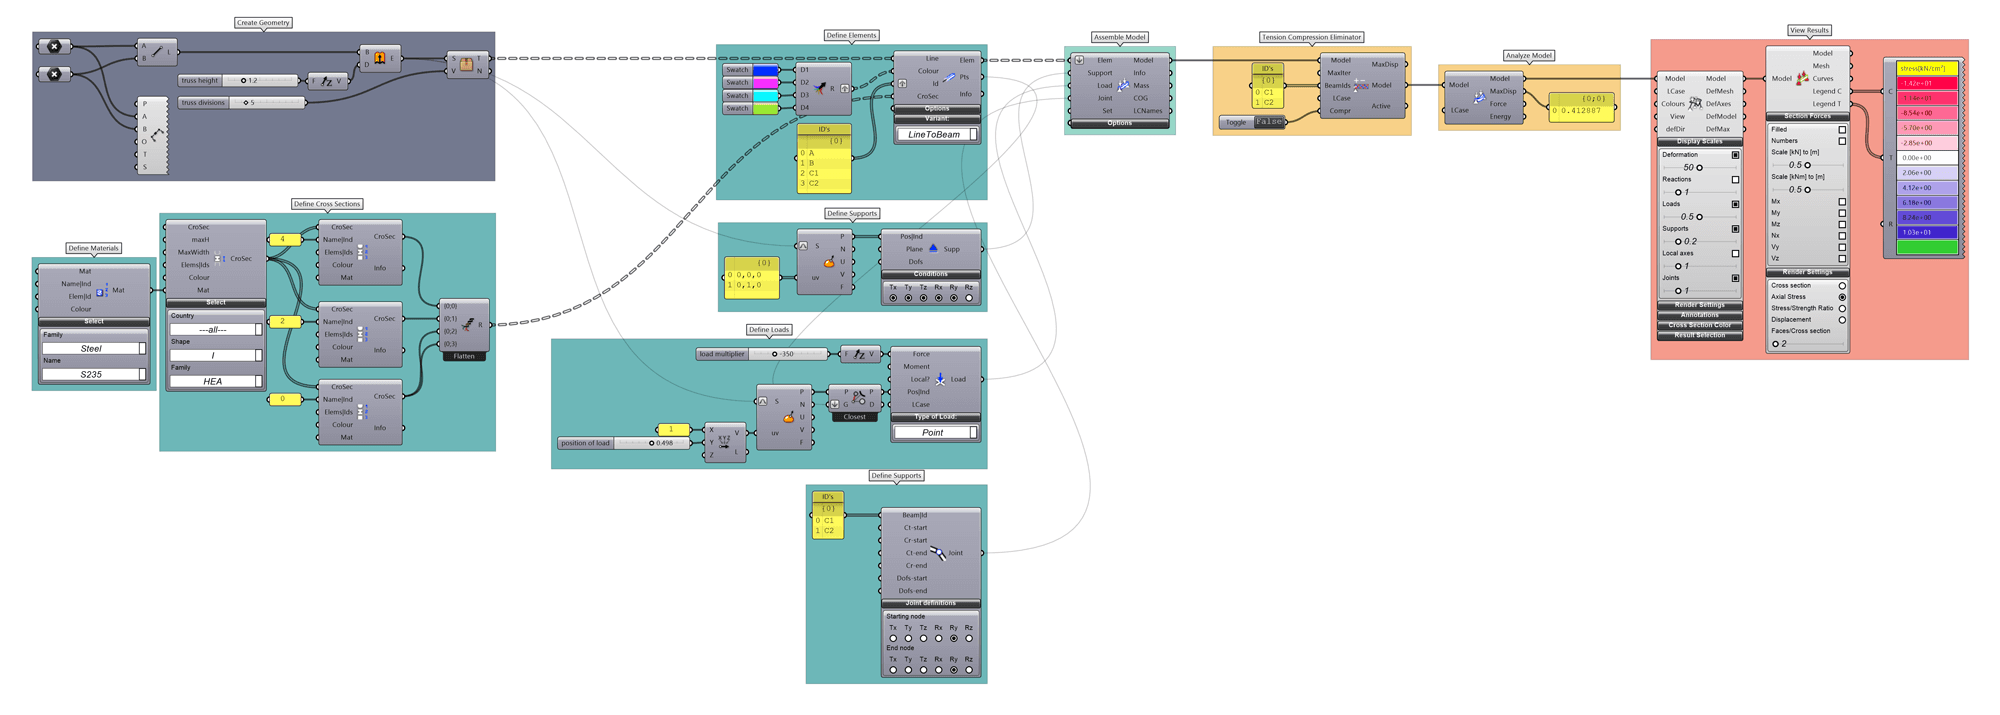
Fig 7. Parametric truss analysis using Karamba3D. [Karamba3D website]
I've previously written about Pynite as a tool for finite element analysis with Python. Karamba has the advantage of native Grasshopper integration. If you're serious about FEA in Grasshopper, Karamba3D is the way to go. The next best alternative would be to set up geometry in Grasshopper then export the whole shebang into SAP2000 or ETABS.
5.2 Lunchbox
Lunchbox provides a collection of utility components for computational design. While many features are geared toward architecture, it includes useful tools for generating structural patterns, paneling systems, and geometric operations that aren't in vanilla Grasshopper.
5.3 Elefront
Elefront provides better control over Rhino layer management, attribute assignment, and backing workflows. If you are generating documentation from Grasshopper or tagging metadata to your Rhino geometry, Elefront is almost essential. Some of Elefront's capabilities now ship natively with the release of Rhino 8, but I personally still find Elefront to be more intuitive and easier to use.
5.4 A word of caution about plugins
Plugins can be incredibly powerful, but they also introduce dependencies. If you share a Grasshopper file with a colleague, they'll need the same plugins installed. Version mismatches can also cause headaches. I've seen beautiful definitions become unusable because a plugin was updated and broke backwards compatibility.
If you are just starting out, my recommendation is to start with vanilla Grasshopper until you hit a clear limitation. When you do, search for a plugin that solves that specific problem. Don't install everything just because it exists - that's how you end up with a bloated, fragile workflow. Be deliberate about your dependencies!
Also, keep in mind that the Grasshopper development community is active. New components get added to the base installation regularly. For example, Rhino 8 (released in 2023) incorporated many components that previously required third-party plugins, and this trend will likely continue with each version.
6.0 Best Practices
You've learned the fundamentals and seen practical examples - now let's talk about how to work well in Grasshopper. After working with Grasshopper for a while, you'll develop your own workflow preferences, but here are some hard-won lessons that might save you (and your colleagues) some pain.
6.1 Organise your canvas
A messy Grasshopper definition is like a messy desk - it works until you need to find something. Use Groups (Ctrl+G) to organise related logic, and use Scribbles (open up search by double-clicking the canvas and type "~") to annotate logic. Color-code groups by function: blue for geometry, red for analysis, green for outputs, etc. Future you (and your colleagues) will thank you.
When a definition starts spanning multiple screen widths, it's time to think about modularity. Which brings us to...
6.2 Single responsibility principle
This is borrowed from software engineering, but it applies just as well to Grasshopper. Each "module" of your definition should do one thing well. Generate grid? One group. Create members? Another group. Apply loads? Another group.
This makes debugging infinitely easier. When something breaks (and it will), you can isolate which module is the culprit by enabling/disabling groups. It also makes reuse possible - a well-designed module can be copy-pasted into another definition. (As a side-note, yes, we all know copy-pasting code is not always best practice, and there are more advanced methods to avoid this. If you're interested, look into "Clusters" and "Hops".)
6.3 When to split a file
As your Grasshopper skills grow, you'll create increasingly complex definitions. At some point, you'll ask: should this be one file or multiple?
Here's my heuristic: if different parts of your definition serve distinctly different purposes (say, one part generates geometry and another does analysis), and they don't need to run simultaneously, split them. If they're tightly coupled and need to update together, keep them in one file.
For example, on a recent project, I had one definition for generating geometry and performing a finite element analysis, and a separate definition for taking the FEA results and modeling them inside Revit (using Rhino.Inside.Revit). This kept each definition focused and performant.
The downside of splitting is managing data handoff between files. You'll typically bake intermediate results, then reference that geometry in the next file. Alternatively you can use the Data Input/Data Output components to pass data between files. Whichever you end up doing, document your workflow clearly, or six months later you won't remember which file does what.
6.4 Avoid dependency hell
This is particularly relevant if you use plugins. As stated earlier, every plugin you add is a dependency that others must install to use your file. I've received Grasshopper files from some engineers that required multiple plugins I'd never heard of, half of which were no longer maintained. Not fun.
If you must use plugins, document them clearly. Create a text panel at the top of your canvas listing required plugins and versions (kind of like a requirements.txt or a pyproject.toml). Better yet, check if you can achieve the same result with vanilla Grasshopper - it's often possible with a bit more work.
6.5 DRY (Don't Repeat Yourself) ...sometimes
In programming, DRY is often taken as gospel - never duplicate logic. More recently though, I have come to the opinion that it is a bit more nuanced. Let me explain.
If you're doing the exact same operation multiple times, yes, find a way to consolidate - usually by restructuring your data into lists or trees and letting implicit iteration handle it. But sometimes, duplicating a small cluster of components is clearer than contorting your data structure to force reuse. Clarity and simplicity trumps cleverness. The goal is to solve the problem, not to write the most theoretically pure definition.
6.6 Use version control (kind of)
Grasshopper (*.gh) files are binary, so traditional Git-based version control doesn't work well. (Side note: *.ghx files store your definition in a JSON-like format, so theoretically works with git. However, I have found that changes that are tracked are way too sensitive for this to work well. For instance, if you move a single component, it'll generate many lines of diffs in git, making reviews of commit history impossible. In addition, *.ghx files are often orders of magnitudes larger in size than the binary *.gh files. Not worth it in my opinion). My approach: Save dated copies when you reach milestones.
6.7 Name your components
This seems obvious, but I see it violated constantly. Right-click any component and you will see a textbox that you can use to create a custom label. "Max Bay Spacing [ft]" is infinitely clearer than "x" on a Number Slider.
6.8 Comment your logic
Use text panels to explain non-obvious logic. Not every component needs a comment, but any time you're doing something "clever" or making an assumption, document it. "Note: Assuming 1.5x for impact load" or "This matches SAP2000's local coordinate system" - these notes are lifesavers during reviews or handoffs.
7.0 What Next?
If you've made it this far, you now have a solid starting point in Grasshopper from a structural engineering perspective. You understand the basic primitives, how data flows through lists and trees, and you've seen a practical workflows that you can adapt to your own practice.
But this is just the beginning. Grasshopper is deep, and the more you use it, the more you'll discover its capabilities. Here are some references and directions you might explore next:
7.1 Analysis Integration
Look into Karamba3D for native Grasshopper analysis, or investigate how to export to your preferred FEA software. The pattern is always the same: generate geometry parametrically, extract data, format for your tool, run analysis, interpret results.
7.2 Rhino.Inside.Revit
Rhino.Inside.Revit - The next step after analysis integration would be to find a way to get it into Revit for modelling and creating design drawings.
7.3 Python or C#
The Python component opens up the entire Python ecosystem within Grasshopper. In Rhino 8, you are now able to pip install almost any dependency directly in the Python component! If you want even more performance, you can write C# scripts using the C# Script component.
7.4 Develop a computational mindset
One final thought: the real power of learning Grasshopper isn't just about mastering this specific tool - it's about developing a computational mindset:
- you start to see patterns,
- you recognise when a problem is parametric in nature,
- you think in terms of data flow and transformations.
These skills transfer across domains, whether you're working in Grasshopper, Python or Excel. So start small - pick a tedious task from your current project and try to automate it. Build something that saves you 15 minutes. Then build something that saves you an hour. Before you know it, you'll be tackling problems you didn't even know were solvable.
Welcome to parametric modelling. Now go build something interesting!

Featured Tutorials and Guides
If you found this tutorial helpful, you might enjoy some of these other tutorials.

Bonsai BIM - The Essential IFC Tool for Structural Engineering Workflows
The IFC tool every structural engineer should have in their toolkit

Petru Conduraru