Building Custom Engineering Tools in Python with PyQt
![[object Object]](/_next/image?url=%2Fimages%2Fauthors%2Fhakan_keskin.jpg&w=256&q=75)
In this tutorial, Hakan Keskin walks us through the process of building a professional desktop engineering tool using Python and PyQt. If you've ever found yourself repeating the same manual steps around your FE workflow, e.g. exporting tables, reformatting data or assembling reports, then building a custom tool to streamline operations is a great option.
Rather than replacing ETABS, the application that Hakan walks us through, augments it; Python orchestrates the workflow, PyQt provides a clean interface, and ETABS remains the analysis engine.
Hakan has done a fantastic job of demonstrating how we can use Python and PyQt to build robust custom tools that interface with your FE software. This case study focuses on ETABS, but the exact same approach demonstrated here can be used with any commercial software that exposes an API.
This tutorial is ideal if you're looking to automate your workflow and save time. This is an in-depth tutorial...stick with it! Once you've completed it, you'll be ready to start using PyQt in your own projects. Check out Hakan's website Out of Plane - he's building an impressive range of tools and resources for structural engineers.
📁 You can download the complete code for this tutorial from the resources panel above.

1. Introduction
Commercial finite element (FE) software such as ETABS/SAP2000 is exceptionally capable at analysis and design. Yet, in day-to-day engineering work, the bottleneck is rarely the solver itself, it is the workflow around it.
If you have ever repeated the same sequence across projects, you already know the pattern:
- Open a model and confirm assumptions
- Run a familiar analysis routine
- Export tables or results
- Clean and reformat data
- Build summaries in spreadsheets
- Prepare a report with a consistent structure
These steps are not difficult, but they are repetitive, error-prone, and hard to standardise across teams and projects.
This is exactly where custom tools make a difference.
In this article, I will walk through a case study of building a professional desktop tool using Python + PyQt, designed to interface with a commercial FE application (ETABS). The focus is not on replacing FE software, but on augmenting it with a workflow-oriented UI that turns repeatable engineering steps into a reliable, reusable process.
-
ETABS remains the analysis engine.
-
Python orchestrates the workflow.
-
PyQt makes the workflow usable.
1.1 What we'll build
Rather than discussing UI frameworks in abstract terms, we will build something concrete, step by step. By the end, you will have a desktop-style engineering tool with:
-
A split layout: a left workflow panel and a main results area,
-
Tabs for results, logs, and settings,
-
Buttons that:
- connect to ETABS,
- trigger data retrieval (e.g., table results),
- and render the data in a clean UI table.
-
A toggle-driven UI behaviour (show/hide panels, enable/disable actions),
-
A minimal but realistic pattern for ETABS interaction calls.
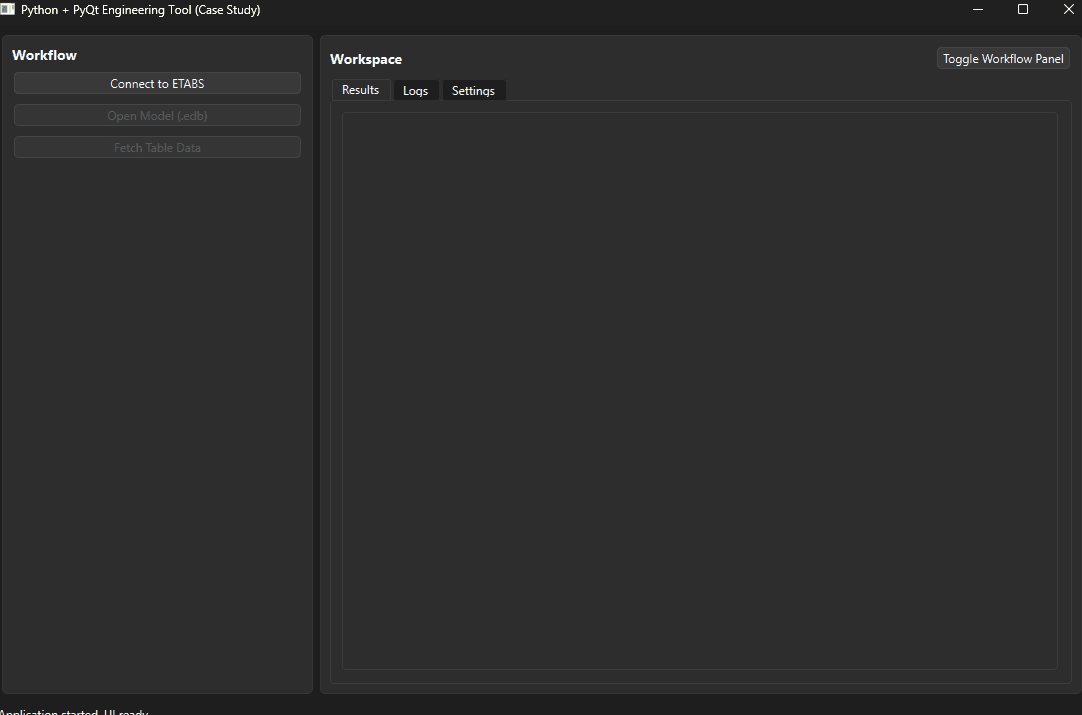
Fig 1. Custom tool UI.
The objective is to show how to think about building tools, not only how to write code. This is a case study in custom tool development for engineers. It is not a full ETABS API reference, and it does not publish proprietary, project-specific automation code. Instead, it provides a transferable blueprint:
- how to structure a UI-driven workflow,
- how to separate UI from engineering logic,
- how to manage states and user feedback,
- and how to integrate commercial FE software in a maintainable way.
If you can connect to one solver, you can apply the same pattern to many others.
1.2 Why PyQt?
PyQt is a set of Python bindings for the Qt framework, used to build cross-platform graphical user interfaces (GUIs).
When scripts evolve into tools used repeatedly (or by other engineers), the UI matters. PyQt (Qt for Python) is a practical choice for building professional tools because it provides:
- a professional desktop application feel,
- mature layout and widget systems (splitters, tabs, tables),
- a clean event system (signals/slots) suited to workflow steps,
- and enough structure to scale from a small utility to a real internal product.
In the next section, we will start with a clean application skeleton and immediately implement a split UI layout that reflects an engineering workflow.
2. Building the split layout UI skeleton
A good engineering tool UI is not a random collection of widgets, it is a visual representation of a workflow. In this step, we will build the application shell with a structure that is common in professional engineering software:
- A left panel dedicated to workflow actions (connect, fetch, run, export)
- A main panel for results, logs, and settings
- A clean split layout using
QSplitter, so panels can be resized naturally
2.1 Main window + splitter layout (PyQt6)
We start with three building blocks:
QMainWindow→ provides the application shell (menu/tool/status bar support)QSplitter→ creates a resizeable split between panels- Two panels → a left Workflow panel and a right Workspace panel
The goal is to establish a professional layout first, and then progressively attach functionality.
2.1.1 Imports and application entry point
PyQt applications always have the same entry pattern:
- Create a
QApplication - Create your main window
- Show it
- Start the Qt event loop
import sys

# PyQt6 widgets
from PyQt6.QtWidgets import (
    QApplication, QMainWindow, QWidget,
    QVBoxLayout, QHBoxLayout, QSplitter,
    QPushButton, QLabel, QFrame
)

# Core Qt enums and constants
from PyQt6.QtCore import Qt

def main():
    # Every PyQt app needs exactly one QApplication instance.
    app = QApplication(sys.argv)

    # Create and show the main window.
    window = MainWindow()
    window.show()

    # Start the Qt event loop.
    sys.exit(app.exec())


if __name__ == "__main__":
    main()
2.1.2 The main window skeleton
QMainWindow is ideal for desktop tools because it already supports:
- status bar feedback (great for engineering workflows)
- toolbars (optional later)
- central widget composition (our splitter will live here)
class MainWindow(QMainWindow):
    def __init__(self):
        super().__init__()

        # Window metadata
        self.setWindowTitle("Python + PyQt Engineering Tool (Case Study)")
        self.resize(1100, 700)

        # Build the central UI
        self._build_ui()

        # A simple feedback channel for the user
        self.statusBar().showMessage("Ready")
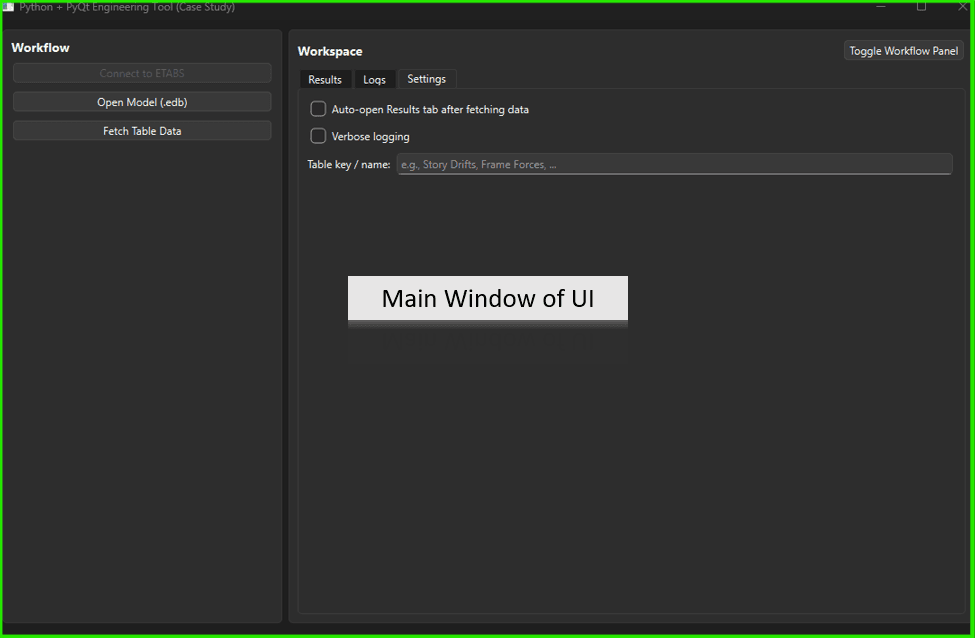
Fig 2. Main window skeleton.
2.1.3 Building the split layout and central container
The central area is composed of three layers: a QWidget container, a horizontal layout to host the splitter, and the QSplitter itself which divides the window into left and right panels.
def _build_ui(self):
    # Central widget is required by QMainWindow.
    central = QWidget()
    self.setCentralWidget(central)

    # Layout that will host the splitter.
    central_layout = QHBoxLayout()
    central.setLayout(central_layout)

    # Splitter gives us resizable panels.
    splitter = QSplitter(Qt.Orientation.Horizontal)

    # Left and right panels (built via helper methods).
    left_panel = self._build_left_panel()
    main_panel = self._build_main_panel()

    splitter.addWidget(left_panel)
    splitter.addWidget(main_panel)

    # Set initial sizes: left narrower, main wider.
    splitter.setSizes([320, 780])

    # Add splitter into the main layout.
    central_layout.addWidget(splitter)

    # Keep a reference for later (toggle/hide behaviour in Step 4).
    self.splitter = splitter
    self.left_panel = left_panel
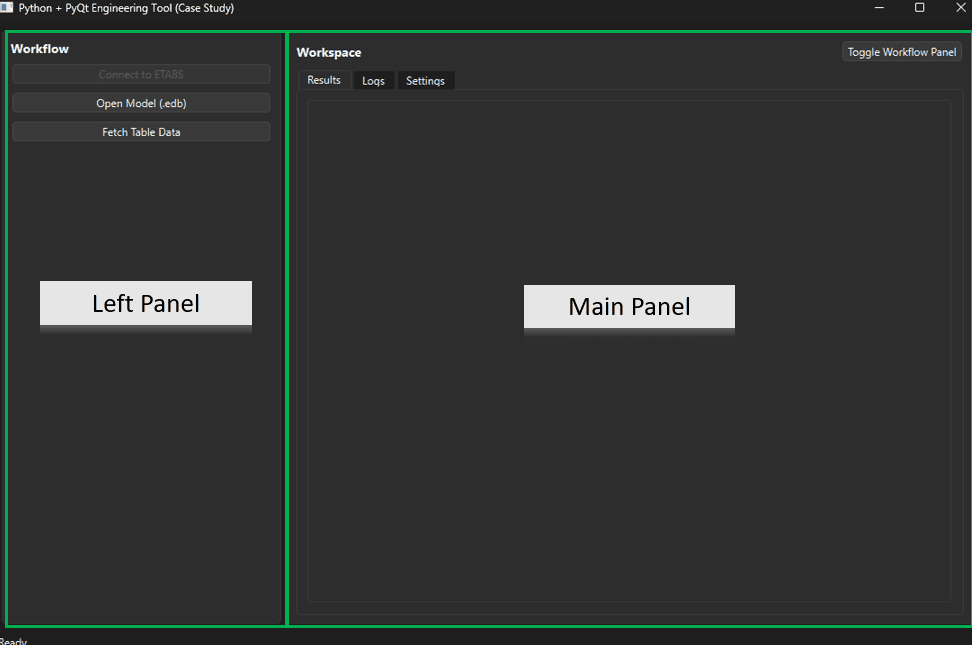
Fig 3. Main window showing the splitter layout with a left workflow panel and a right workspace panel.
2.1.4 Left workflow actions panel
The left panel acts as a workflow controller. At this stage, we place the primary workflow actions that an engineer expects in a desktop tool:
- connecting to ETABS,
- opening an existing model file,
- fetching results tables.
def _build_left_panel(self) -> QWidget:
    panel = QFrame()
    panel.setFrameShape(QFrame.Shape.StyledPanel)
    layout = QVBoxLayout(panel)

    title = QLabel("Workflow")
    title.setStyleSheet("font-weight: bold; font-size: 14px;")
    layout.addWidget(title)

    self.btn_connect = QPushButton("Connect to ETABS")
    self.btn_open_model = QPushButton("Open Model (.edb)")
    self.btn_fetch_table = QPushButton("Fetch Table Data")

    layout.addWidget(self.btn_connect)
    layout.addWidget(self.btn_open_model)
    layout.addWidget(self.btn_fetch_table)

    layout.addStretch(1)
    return panel
2.1.5 Main panel - workspace placeholder
The right side is the workspace. In the next step, this becomes a tabbed interface:
- Results (tables)
- Logs (console output)
- Settings (options)
For now, we simply reserve the space. In section 3, we will upgrade this panel into a tabbed workspace and add a small header area that also hosts the workflow-panel toggle action.
def _build_main_panel(self) -> QWidget:
    panel = QFrame()
    panel.setFrameShape(QFrame.Shape.StyledPanel)

    layout = QVBoxLayout(panel)

    title = QLabel("Workspace")
    title.setStyleSheet("font-weight: bold; font-size: 14px;")
    layout.addWidget(title)

    hint = QLabel("Tabs (Results / Logs / Settings) will be added in Step 3.")
    hint.setStyleSheet("color: #666;")
    layout.addWidget(hint)

    layout.addStretch(1)
    return panel
2.1.6 Full code
Here is the complete assembled code for Step 2. You can place this in main.py and run it. Note that the toggle button is placed in the left panel for now; in Step 3, we will move it into the workspace header so it remains accessible even when the workflow panel is collapsed.
import sys
from PyQt6.QtWidgets import (
    QApplication, QMainWindow, QWidget,
    QVBoxLayout, QHBoxLayout, QSplitter,
    QPushButton, QLabel, QFrame
)
from PyQt6.QtCore import Qt


class MainWindow(QMainWindow):
    def __init__(self):
        super().__init__()
        self.setWindowTitle("Python + PyQt Engineering Tool (Case Study)")
        self.resize(1100, 700)
        self._build_ui()
        self.statusBar().showMessage("Ready")

    def _build_ui(self):
        central = QWidget()
        self.setCentralWidget(central)

        central_layout = QHBoxLayout()
        central.setLayout(central_layout)

        splitter = QSplitter(Qt.Orientation.Horizontal)

        left_panel = self._build_left_panel()
        main_panel = self._build_main_panel()

        splitter.addWidget(left_panel)
        splitter.addWidget(main_panel)
        splitter.setSizes([320, 780])

        central_layout.addWidget(splitter)

        self.splitter = splitter
        self.left_panel = left_panel

    def _build_left_panel(self) -> QWidget:
        panel = QFrame()
        panel.setFrameShape(QFrame.Shape.StyledPanel)

        layout = QVBoxLayout(panel)

        title = QLabel("Workflow")
        title.setStyleSheet("font-weight: bold; font-size: 14px;")
        layout.addWidget(title)

        self.btn_connect = QPushButton("Connect to ETABS")
        self.btn_open_model = QPushButton("Open Model (.edb)")
        self.btn_fetch_table = QPushButton("Fetch Table Data")
        self.btn_toggle_panel = QPushButton("Toggle Left Panel")

        layout.addWidget(self.btn_connect)
        layout.addWidget(self.btn_open_model)
        layout.addWidget(self.btn_fetch_table)
        layout.addWidget(self.btn_toggle_panel)

        layout.addStretch(1)
        return panel

    def _build_main_panel(self) -> QWidget:
        panel = QFrame()
        panel.setFrameShape(QFrame.Shape.StyledPanel)

        layout = QVBoxLayout(panel)

        title = QLabel("Workspace")
        title.setStyleSheet("font-weight: bold; font-size: 14px;")
        layout.addWidget(title)

        hint = QLabel("Tabs (Results / Logs / Settings) will be added in Step 3.")
        hint.setStyleSheet("color: #666;")
        layout.addWidget(hint)

        layout.addStretch(1)
        return panel


def main():
    app = QApplication(sys.argv)
    window = MainWindow()
    window.show()
    sys.exit(app.exec())


if __name__ == "__main__":
    main()
3. Adding tabs to the workspace
Now that the application shell is in place (split layout + workflow panel), we can start building the working area. Most professional engineering tools organise outputs into tabs, because a lot of engineering work naturally switches between:
- Results (tables / summaries)
- Logs (what happened, warnings, errors)
- Settings (options that influence workflow)
In this step, we will:
-
Replace the right-side Workspace placeholder with a
QTabWidget, -
Create three tabs: Results, Logs, Settings,
-
Add a small logging utility (
log()) so button actions can report what they are doing.
3.1 Why tabs improve engineering UX
Tabs help prevent a common failure mode in automation tools: silent execution.
Engineers need visibility:
- What data was fetched?
- Did the action succeed?
- Were there warnings?
- What assumptions were used?
A dedicated Logs tab provides transparency without cluttering the UI. Meanwhile, Settings keeps options discoverable but separate from day-to-day actions.
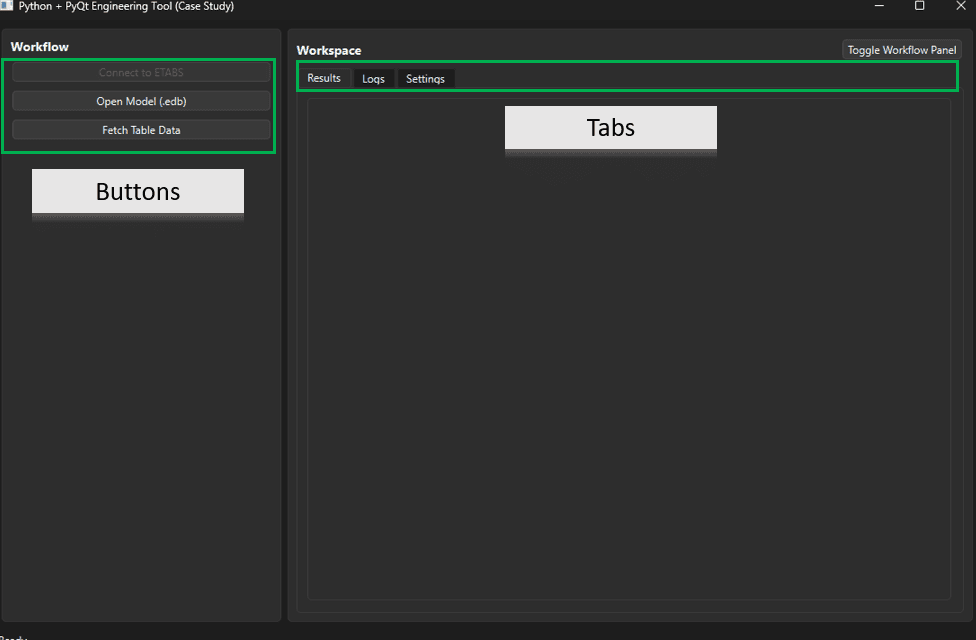
Fig 4. Tabs added to the workspace.
3.2 Adding QTabWidget to the main panel
We will replace _build_main_panel() from Step 2 with a tabbed workspace. The right panel in our UI will now host:
Resultstab: placeholder area (table comes later)Logstab: aQPlainTextEditused as a consoleSettingstab: a few simple checkboxes/options (placeholders for now)
We also include QFileDialog because the workflow will allow users to browse and open an existing ETABS .edb model directly from the UI.
# Add these imports to the existing import list
from PyQt6.QtWidgets import (
    QTabWidget, QPlainTextEdit, QCheckBox, QFormLayout, QLineEdit, QFileDialog
)
from PyQt6.QtCore import QDateTime
3.3 The logging utility (a small but high-value feature)
Before we build the tabs, we add a small helper:
log("message")appends timestamped lines to the logs tab- This becomes the backbone of user feedback, debugging, and trust.
In engineering tools, a good log panel can save hours.
class MainWindow(QMainWindow):
    def __init__(self):
        super().__init__()
        self.setWindowTitle("Python + PyQt Engineering Tool (Case Study)")
        self.resize(1100, 700)

        self._build_ui()

        self.statusBar().showMessage("Ready")
        self.log("Application started. UI ready.")

    def log(self, message: str):
        """Append a timestamped message into the Logs tab."""
        ts = QDateTime.currentDateTime().toString("yyyy-MM-dd HH:mm:ss")
        line = f"[{ts}] {message}"

        # self.txt_log is created in Step 3.4 (Logs tab)
        if hasattr(self, "txt_log") and self.txt_log is not None:
            self.txt_log.appendPlainText(line)

        # Also mirror a short version to the status bar
        self.statusBar().showMessage(message)
3.4 Building the tabbed workspace
We now build the tabs inside _build_main_panel(). Notice that the "Toggle Workflow Panel" button has moved here into the workspace header, so it remains accessible even when the left panel is collapsed.
- Create
QTabWidget - Build each tab as its own widget
- Keep references to important widgets (e.g., log text box) for later
def _build_main_panel(self) -> QWidget:
    panel = QFrame()
    panel.setFrameShape(QFrame.Shape.StyledPanel)
    layout = QVBoxLayout(panel)

    header = QHBoxLayout()
    title = QLabel("Workspace")
    title.setStyleSheet("font-weight: bold; font-size: 14px;")

    self.btn_toggle_panel = QPushButton("Toggle Workflow Panel")
    self.btn_toggle_panel.setToolTip("Show/Hide the left workflow panel")

    header.addWidget(title)
    header.addStretch(1)
    header.addWidget(self.btn_toggle_panel)
    layout.addLayout(header)

    self.tabs = QTabWidget()
    layout.addWidget(self.tabs)

    self.tabs.addTab(self._build_results_tab(), "Results")
    self.tabs.addTab(self._build_logs_tab(), "Logs")
    self.tabs.addTab(self._build_settings_tab(), "Settings")

    return panel
3.5 Results tab (placeholder for tables)
For now, the Results tab is a placeholder area. In Step 5, we will display real table data here using QTableWidget.
def _build_results_tab(self) -> QWidget:
    w = QWidget()
    layout = QVBoxLayout(w)

    hint = QLabel(
        "Results will appear here.\n"
        "In Step 5 we will render table data retrieved from the FE software."
    )
    hint.setStyleSheet("color: #666;")
    layout.addWidget(hint)

    layout.addStretch(1)
    return w
3.6 Logs tab (your built-in console)
QPlainTextEdit is ideal for logs because it's fast and readable. We keep a reference as self.txt_log, so our log() method can append lines.
def _build_logs_tab(self) -> QWidget:
    w = QWidget()
    layout = QVBoxLayout(w)

    self.txt_log = QPlainTextEdit()
    self.txt_log.setReadOnly(True)
    self.txt_log.setPlaceholderText("Logs will appear here...")
    layout.addWidget(self.txt_log)

    return w
3.7 Settings tab (lightweight options)
Settings should be simple and visible. Even a few checkboxes make a tool feel real. We add a couple of example options:
- auto-switch to Results tab after fetching data
- verbose logging (extra messages)
We also show an example QLineEdit input to demonstrate how parameters can be collected.
def _build_settings_tab(self) -> QWidget:
    w = QWidget()
    form = QFormLayout(w)

    self.chk_auto_show_results = QCheckBox("Auto-open Results tab after fetching data")
    self.chk_verbose_log = QCheckBox("Verbose logging")

    # A simple example input (later: filter name, load combo set, etc.)
    self.txt_table_key = QLineEdit()
    self.txt_table_key.setPlaceholderText("e.g., Story Drifts, Frame Forces, ...")

    form.addRow(self.chk_auto_show_results)
    form.addRow(self.chk_verbose_log)
    form.addRow("Table key / name:", self.txt_table_key)

    return w
3.8 Wiring our first visible interaction (optional mini-demo)
At this point, we can already log a message when the user changes settings, without touching any FE software. For example, toggle verbose logging:
# In __init__ (after _build_ui()):
self.chk_verbose_log.stateChanged.connect(
    lambda _: self.log("Verbose logging setting changed.")
)
3.9 Summary of step 3
We now have a workspace with a tabbed UI (Results / Logs / Settings), a dedicated Logs console with timestamps via log(), and settings scaffolding for workflow parameters. In the next section, we will connect the left panel buttons to real behaviours.
4. Wiring the Workflow: Buttons, State, and UI Behaviour
Up to this point, we have focused on structure: a split layout, a tabbed workspace, and clearly defined UI regions. In this step, we start adding behaviour.
The goal is not yet to perform real FE operations, but to demonstrate how:
- workflow buttons are connected to logic,
- UI state changes based on actions,
- feedback is continuously provided to the user.
This is where the tool starts to feel alive.
4.1 A simple but important principle: UI triggers intent
A recurring design principle in this case study is:
Buttons do not "do work", they express intent.
The actual work — connecting to ETABS, fetching tables, validating states — belongs to the application / engineering logic. At this stage, we simulate those actions with logging and UI feedback.
# In MainWindow.__init__(), after _build_ui()

self.btn_connect.clicked.connect(self.on_connect_clicked)
self.btn_open_model.clicked.connect(self.on_open_model_clicked)
self.btn_fetch_table.clicked.connect(self.on_fetch_table_clicked)
self.btn_toggle_panel.clicked.connect(self.on_toggle_left_panel)
4.2 Tracking application state
Engineering tools almost always depend on state: whether the solver is available, whether a model is open, and whether downstream actions are allowed.
Rather than maintaining a separate self.is_connected flag in the UI layer, we query a single source of truth: the interface layer's is_connected() method. This keeps the workflow logic consistent and prevents mismatches between UI flags and the actual COM connection. We will build this interface layer (EtabsClient) in Step 6; for now, the important principle is that state should live in one place.
4.3 Connect button: establishing an ETABS session (pattern first)
When the user clicks Connect to ETABS, we establish an ETABS COM session. In early steps, the UI behaviour is what matters: logs, enabling/disabling actions, and busy state. In Step 6, we implement the ETABS interface layer so the same button triggers a real ETABS session and exposes SapModel safely to the rest of the app.
The pattern is straightforward:
- The tool attempts a connection
- The user gets immediate feedback
- The internal state is updated
- Downstream actions become enabled
def on_connect_clicked(self):
    if self.etabs_client.is_connected():
        self.log("Already connected to ETABS.")
        return

    self.log("Attempting to connect to ETABS...")

    # --- Placeholder connection logic ---
    # In Step 6, this calls self.etabs_client.connect_attach()
    self.log("Connection successful.")
4.4 Fetch button: enforcing workflow order
The fetch action is wired to the workflow, but we intentionally defer the full implementation until Step 5 (table rendering) and Step 6 (interface layer). For now, the important thing is that the Fetch button will validate inputs, call the interface layer, and pass normalised (headers, rows) into the UI table renderer.
# Pseudocode for the fetch workflow:
#   validate inputs
#   set busy
#   headers, rows = etabs_client.get_table(table_key)
#   set_results_table(headers, rows)
#   clear busy
This simple guard already demonstrates an important concept:
UI logic should actively guide the user through the correct workflow.
4.5 Toggle button: showing and hiding the workflow panel
Professional tools often allow panels to be hidden to focus on results. Because we kept references to the splitter and left panel in Step 2, this becomes trivial.
def on_toggle_left_panel(self) -> None:
    sizes = self.splitter.sizes()  # [left, right]
    left_w = sizes[0]

    if left_w > 0:
        self._left_panel_last_width = left_w
        self.splitter.setSizes([0, sum(sizes)])
        self.log("Workflow panel collapsed.")
    else:
        restore = max(240, int(self._left_panel_last_width or 320))
        total = sum(sizes) if sum(sizes) > 0 else 1100
        self.splitter.setSizes([restore, max(200, total - restore)])
        self.log("Workflow panel restored.")
This small feature dramatically improves usability when working with large tables.
4.6 Enabling / disabling actions based on state
A hallmark of a good engineering UI is preventing invalid actions. In this workflow, both Open Model and Fetch Table Data remain disabled until a valid ETABS session is established. Once connected, the user can browse for a .edb file and open it, then fetch table data.
# In __init__(), after defining buttons
self.btn_open_model.setEnabled(False)
self.btn_fetch_table.setEnabled(False)

# In on_connect_clicked(), after a successful connection:
self.btn_fetch_table.setEnabled(True)
self.btn_open_model.setEnabled(True)
self.btn_connect.setEnabled(False)
This eliminates an entire class of user errors without extra documentation.
4.7 What the user experiences now
At this stage, the tool already behaves like a real application:
- Buttons respond immediately
- Logs clearly describe what is happening
- Invalid actions are blocked
- Panels can be shown or hidden
- Tabs switch automatically based on workflow
All of this is achieved before any real FE integration.
4.8 Summary of step 4
We have introduced real interaction into the tool: buttons are wired via PyQt signals and slots, application state is tracked through a single source of truth, UI behaviour changes based on that state, logging provides continuous feedback, and workflow order is enforced by design. This lays the foundation for the next step: showing actual data in the Results tab.
5. Displaying table data in the results tab
This is the step where the tool becomes visually convincing. Until now, we had structure, tabs, logs, and button behaviour. Now we will make the Results tab actually display data in a real table. In practice, FE software returns results as structured tables — rows, columns, headers, and values. So our goals in Step 5 are:
-
Add a table widget to the Results tab
-
Define a reusable function that populates the table from
(headers, rows) -
Update the Fetch Table Data button to load representative mock data
-
Keep the design FE-ready (so we can swap mock data with ETABS data later)
5.1 Choosing a table widget: QTableWidget vs QTableView
There are two common approaches in Qt:
QTableWidget: easiest for quick tools and demos (widget-managed table)QTableView + Model: best for scaling (model/view architecture)
For this case study, we start with QTableWidget because it is clear, short, and perfect for demonstrating the full UI-driven workflow. Later, you can upgrade to QTableView without changing the rest of the UI structure. We start by adding the required import.
# Add to imports
from PyQt6.QtWidgets import QTableWidget, QTableWidgetItem
5.2 Upgrading the results tab: add a real table
We replace the placeholder label in _build_results_tab() with a real QTableWidget. We also keep a reference (self.tbl_results) so we can populate it later.
def _build_results_tab(self) -> QWidget:
    w = QWidget()
    layout = QVBoxLayout(w)

    self.tbl_results = QTableWidget()
    self.tbl_results.setAlternatingRowColors(True)
    self.tbl_results.setSortingEnabled(False)
    self.tbl_results.setRowCount(0)
    self.tbl_results.setColumnCount(0)

    layout.addWidget(self.tbl_results)
    return w
5.3 A reusable helper: populate a table from headers and rows
This is the core idea:
- FE software provides a "table"
- Our UI expects "headers + rows"
- We create one function to bridge the two
This helper will remain valid when we switch from mock data to ETABS data.
def set_results_table(self, headers: List[str], rows: List[List[Any]]) -> None:
    headers = headers or []
    rows = rows or []

    self.tbl_results.clear()
    self.tbl_results.setColumnCount(len(headers))
    self.tbl_results.setRowCount(len(rows))
    self.tbl_results.setHorizontalHeaderLabels([str(h) for h in headers])

    for r, row in enumerate(rows):
        for c, val in enumerate(row):
            item = QTableWidgetItem("" if val is None else str(val))
            self.tbl_results.setItem(r, c, item)

    self.tbl_results.resizeColumnsToContents()
5.4 Representative mock data (FE-like table)
For demonstration, we use representative "FE-like" table output. The key contract is that the UI always consumes (headers, rows) — the data source can evolve without changing the rendering logic. In the assembled example, this mock output is returned by the interface layer (EtabsClient.get_table()), so the UI code remains solver-agnostic.
def get_mock_table(self, table_key: str) -> Tuple[List[str], List[List[Any]]]:
    headers = ["Story", "Combo", "Drift (mm)", "Drift Ratio", "Status"]
    rows = [
        ["Roof", "EQX", 18.2, 0.0041, "OK"],
        ["L4",   "EQX", 22.7, 0.0050, "OK"],
        ["L3",   "EQX", 29.9, 0.0067, "Check"],
        ["L2",   "EQX", 35.4, 0.0079, "NG"],
        ["L1",   "EQX", 31.2, 0.0069, "Check"],
    ]

    if "force" in table_key.lower():
        headers = ["Element", "Combo", "P (kN)", "V2 (kN)", "M3 (kNm)"]
        rows = [
            ["C12", "ULS1", -820.5, 44.2,  125.1],
            ["C15", "ULS1", -790.3, 52.8,  132.7],
            ["B07", "ULS1",  120.1, 18.4,   49.5],
        ]

    return headers, rows
5.5 Updating the fetch button: populate the table + log the steps
The fetch handler validates inputs, calls the interface layer, and renders the result. When we introduce EtabsClient in Step 6, the only change will be replacing get_mock_table() with self.etabs_client.get_table() — the rest of the handler stays the same.
def on_fetch_table_clicked(self) -> None:
    if not self.validate_before_fetch():
        return

    table_key = self.txt_table_key.text().strip()

    self.set_busy(True)
    try:
        self.log(f"Fetching ETABS table: '{table_key}' ...")

        headers, rows = self.etabs_client.get_table(table_key)
        self.set_results_table(headers, rows)

        self.log(f"Table loaded: {len(rows)} rows, {len(headers)} columns.")

        if self.chk_auto_show_results.isChecked():
            self.tabs.setCurrentIndex(0)
            self.log("Auto-opened Results tab.")
    except Exception as e:
        self.show_error("ETABS Table Fetch Failed", str(e))
    finally:
        self.set_busy(False)
5.6 What we achieved
At this stage, the tool demonstrates a complete, professional pattern: the user clicks a workflow button, logs show what happens, data appears in a clean Results table, and the workspace behaves like real engineering software — all without yet touching proprietary FE calls. This is exactly the foundation we need before introducing ETABS integration in Step 6.
5.7 Summary of step 5
We upgraded the Results tab into a real table-driven workspace by introducing QTableWidget, building a reusable set_results_table(headers, rows) bridge function, connecting the fetch button to a credible data flow, and keeping the design solver-agnostic so it's ready for real ETABS data.
6. Introducing the ETABS interface layer
Up to Step 5, our tool already behaves like a professional application: buttons trigger actions, logs provide transparency, and results appear in a table. Now we introduce the key engineering capability:
Interfacing with commercial FE software (ETABS) from Python.
Important note before we start:
- We will not publish proprietary, project-specific automation code.
- Instead, we will implement a clean interface layer that demonstrates the correct pattern:
- connect / attach to ETABS,
- request a table,
- normalise the output,
- and feed it into the UI.
The goal is to keep the architecture transferable to many FE platforms while still being realistic.
6.1 Why an interface layer
A common anti-pattern is calling the FE API directly from button handlers. This quickly becomes unmaintainable. Instead, we introduce a dedicated layer:
EtabsClienthandles everything related to ETABS communication- The UI calls
EtabsClientat a high level ("fetch table") - The UI never cares about COM objects, API quirks, or ETABS-specific errors
This gives us cleaner code, easier testing, and the ability to swap or extend to other solvers later.
6.2 The EtabsClient: a minimal, safe wrapper (COM via comtypes)
In practice, there are two common ways to connect to ETABS: attaching to an existing running instance, or starting a new instance under program control.
In this case study, we use the classic and highly reliable Helper + CreateObjectProgID + ApplicationStart pattern. This approach is stable across many real-world environments and keeps the automation session predictable.
The interface layer exposes three high-level methods:
-
connect_attach()→ start and attach to an ETABS instance -
is_connected()→ connection state check -
get_table()→ high-level table retrieval that returns normalised(headers, rows)
The UI will never touch COM objects directly — it will only call these high-level methods.
6.2.1 Imports (COM via comtypes)
You typically need:
comtypes.clientto create/get COM objectsCOMErrorfor error handling
import comtypes.client
from comtypes import COMError
import comtypes.gen.ETABSv1
6.2.2 Implementing EtabsClient with comtypes
This wrapper isolates all ETABS automation logic. Notice that get_table() currently returns representative mock data (the same structure from Step 5). When you are ready to connect to a real ETABS model, you would replace the body of get_table() with actual DatabaseTables API calls — the UI code does not change at all.
class EtabsClient:
    def __init__(self) -> None:
        self.etabs_object = None  # COM ETABSObject
        self.sap_model = None     # COM SapModel

    def is_connected(self) -> bool:
        return self.sap_model is not None

    def connect_attach(self) -> bool:
        try:
            helper = comtypes.client.CreateObject(self._HELPER_PROGID)
            helper = helper.QueryInterface(comtypes.gen.ETABSv1.cHelper)

            obj = helper.CreateObjectProgID(self._ETABS_OBJECT_PROGID)
            obj.ApplicationStart()

            self.etabs_object = obj
            self.sap_model = obj.SapModel
            return True

        except Exception as e:
            raise RuntimeError(f"Failed to start or connect to ETABS: {e}") from e

    def close_etabs(self) -> None:
       if self.etabs_object is None:
            return

        try:
            # Some ETABS versions accept a boolean parameter; others don't.
            try:
                self.etabs_object.ApplicationExit(False)
            except TypeError:
                self.etabs_object.ApplicationExit()
        finally:
            self.etabs_object = None
            self.sap_model = None

    def open_model(self, model_path: str) -> None:
        if not self.is_connected():
            raise RuntimeError("ETABS is not connected.")
        if not model_path or not model_path.strip():
            raise ValueError("Model path is empty.")

        ret = self.sap_model.File.OpenFile(model_path)
        if ret != 0:
            raise RuntimeError(f"ETABS OpenFile failed (ret={ret}).")

    def get_table(self, table_key: str) -> Tuple[List[str], List[List[Any]]]:
        """
        Retrieve table data from ETABS.

        Currently returns representative mock data. Replace the body
        of this method with real DatabaseTables API calls when ready.
        """
        if not self.is_connected():
            raise RuntimeError("ETABS is not connected.")
        if not table_key or not table_key.strip():
            raise ValueError("Table key is empty.")

        headers = ["Story", "Combo", "Drift (mm)", "Drift Ratio", "Status"]
        rows = [
            ["Roof", "EQX", 18.2, 0.0041, "OK"],
            ["L4",   "EQX", 22.7, 0.0050, "OK"],
            ["L3",   "EQX", 29.9, 0.0067, "Check"],
            ["L2",   "EQX", 35.4, 0.0079, "NG"],
            ["L1",   "EQX", 31.2, 0.0069, "Check"],
        ]

        if "force" in table_key.lower():
            headers = ["Element", "Combo", "P (kN)", "V2 (kN)", "M3 (kNm)"]
            rows = [
                ["C12", "ULS1", -820.5, 44.2,  125.1],
                ["C15", "ULS1", -790.3, 52.8,  132.7],
                ["B07", "ULS1",  120.1, 18.4,   49.5],
            ]

        return headers, rows
6.2.3 Why two connection modes?
In real engineering use, you often want both:
-
Attach to running: the engineer opens the model manually, the tool attaches.
-
Start new: the tool launches ETABS (useful for batch jobs or controlled environments).
For most interactive tools, attach to running is the default and feels natural.
6.3 Connecting the UI to EtabsClient (no COM in UI code)
Now we instantiate the client inside our main window. The UI only calls clean methods like connect_attach() and get_table().
# In MainWindow.__init__() after building UI:
self.etabs_client = EtabsClient()
6.4 Updating the connect button (start and connect via ETABS helper)
We replace the placeholder connection with a real ETABS session using the ETABS helper pattern. The UI triggers a single high-level method which starts ETABS, initialises the COM session, and exposes SapModel. From the UI perspective, the workflow remains the same: log progress, handle failures gracefully, and enable downstream actions only after success.
def on_connect_clicked(self) -> None:
    if self.etabs_client.is_connected():
        self.log("Already connected to ETABS.")
        return

    self.set_busy(True)
    self.log("Starting ETABS (classic helper pattern)...")

    try:
        self.etabs_client.connect_attach()
    except Exception as e:
        self.show_error("ETABS Connection Failed", str(e))
        return
    finally:
        self.set_busy(False)

    self.log("ETABS started and connected successfully.")
    self.btn_fetch_table.setEnabled(True)
    self.btn_open_model.setEnabled(True)
    self.btn_connect.setEnabled(False)
6.5 Updating the fetch button (ETABS data → normalised table → UI)
Notice that the UI handler does not change when we introduce the ETABS interface layer. The only evolving piece is EtabsClient.get_table(): today it returns representative output, and later it can be mapped to real ETABS database tables — without touching the UI workflow.
headers, rows = self.etabs_client.get_table(table_key)
6.6 Practical dependency note
To use comtypes, install it via pip:
pip install comtypes
For CSI COM automation on Windows, this is a lightweight and common dependency.
7. Robust UX: validation, logs, and a responsive UI
At this point, the tool is functionally complete: it connects to ETABS, retrieves data, and displays results in a professional UI.
What remains is robustness. This step focuses on the aspects that determine whether a tool feels experimental or production-ready:
- clear validation rules,
- user-friendly error messages,
- consistent feedback,
- and a responsive UI that does not freeze during operations.
These details matter enormously in engineering tools, where trust and clarity are as important as correctness. Engineers do not tolerate ambiguity from software. A tool must clearly answer: what is happening, is it working, did something fail (and if so, why), and what should I do next.
A robust UX does not mean a complex UI. It means predictable behaviour and explicit feedback.
7.1 Input validation before execution
The same philosophy applies to file-based actions. Before opening a model, we validate that an ETABS session exists and that the user selected a valid .edb path. This prevents cryptic COM errors, half-executed workflows, and inconsistent application states.
def validate_before_fetch(self) -> bool:
    if not self.etabs_client.is_connected():
        self.show_error("No ETABS Connection", "Please connect to ETABS before fetching table data.")
        return False

    table_key = self.txt_table_key.text().strip()
    if not table_key:
        self.show_error("Missing Table Key", "Please enter a table name/key in the Settings tab.")
        return False

    return True
7.2 Centralised error display (user-friendly failures)
Raw exceptions should never reach the user. Instead, we introduce a small helper that shows consistent error messages via a dialog and logs the error simultaneously.
from PyQt6.QtWidgets import QMessageBox

def show_error(self, title: str, message: str) -> None:
    QMessageBox.critical(self, title, message)
    self.log(f"ERROR: {message}")
7.3 Updating the fetch logic with validation
We integrate validation into the fetch workflow as a guard clause at the top of the handler.
def on_fetch_table_clicked(self) -> None:
    if not self.validate_before_fetch():
        return
7.4 Busy state: preventing UI freeze and double clicks
This is particularly important for actions like Open Model and Fetch Table, where COM calls may take noticeable time and users tend to click repeatedly if the UI does not respond immediately.
The simplest and most effective pattern is a busy state: disable workflow buttons, change the cursor to "busy", and re-enable after completion.
def set_busy(self, busy: bool) -> None:
    self.btn_connect.setEnabled(not busy and not self.etabs_client.is_connected())
    self.btn_open_model.setEnabled(not busy and self.etabs_client.is_connected())
    self.btn_fetch_table.setEnabled(not busy and self.etabs_client.is_connected())
    self.btn_toggle_panel.setEnabled(not busy)

    if busy:
        self.setCursor(Qt.CursorShape.WaitCursor)
        self.statusBar().showMessage("Working...")
    else:
        self.setCursor(Qt.CursorShape.ArrowCursor)
        self.statusBar().showMessage("Ready")
Then we apply the busy pattern to ETABS calls:
def on_fetch_table_clicked(self) -> None:
    if not self.validate_before_fetch():
        return

    self.set_busy(True)
    try:
        # ... fetch and render logic ...
    except Exception as e:
        self.show_error("ETABS Table Fetch Failed", str(e))
    finally:
        self.set_busy(False)
7.5 Logging as a first-class UX element
At this stage, the log panel is no longer a debugging aid — it is part of the UX.
Good logging practices include:
- one log entry per meaningful step,
- human-readable messages,
- no raw stack traces,
- consistent language.
In practice, engineers trust tools that "talk back" clearly.
7.6 Optional enhancement: confirmation dialogs
For actions that modify models, overwrite files, or trigger long runs, confirmation dialogs add safety.
def confirm_action(self, title: str, message: str) -> bool:
    reply = QMessageBox.question(
        self,
        title,
        message,
        QMessageBox.StandardButton.Yes | QMessageBox.StandardButton.No
    )
    return reply == QMessageBox.StandardButton.Yes
This is particularly useful before:
- running analyses,
- exporting reports,
- modifying model parameters.
7.7 Summary of step 7
We have added production-level robustness to the tool: explicit input validation, consistent error display, clear busy/idle states, prevention of invalid or repeated actions, and user-focused logging. At this point, the tool is not just functional; it behaves like a reliable engineering application.
8 Assembled example, architecture recap, and transferable lessons
Up to this point, we have built a complete engineering tool step by step. Not as a collection of scripts, but as a structured, UI-driven application that:
- connects to commercial FE software (ETABS),
- enforces a clear workflow,
- presents results in a usable form,
- and behaves predictably under real engineering use.
In this final section, we will clarify how all parts fit together, explain how the assembled version should be understood, and extract lessons that transfer far beyond this specific case study.
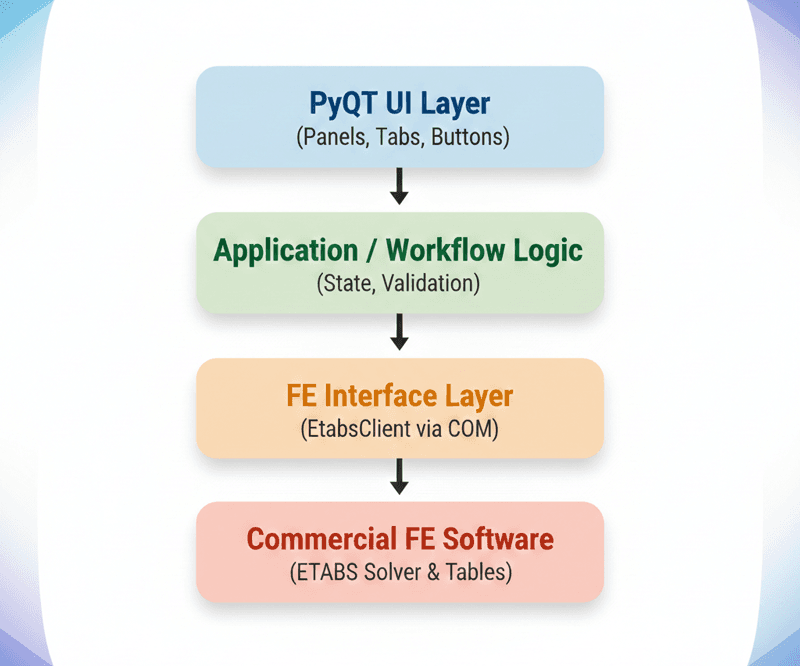
Fig 5. The fully assembled engineering tool.
8.1 Assembled code: how it should be read
In the assembled example (Steps 2–7 combined), the file will typically be structured as follows:
-
imports and dependencies
-
EtabsClient(FE interface layer) -
MainWindow(UI + workflow orchestration) -
small utility methods (logging, validation, busy state)
-
application entry point (
main()) -
Model handling (browse/open
.edb) as a dedicated workflow step between connection and table retrieval
This structure is intentional. It mirrors how professional desktop engineering tools are organised internally, even if they are written in C++ or C# rather than Python.
The value is not in any single function, it is in how responsibilities are distributed.
8.2 Why this architecture works for engineers
This pattern aligns naturally with how engineers think:
- Workflow first: connect → fetch → inspect → report
- Explicit state: connected / not connected, data loaded / not loaded
- Visibility: logs show exactly what happened
- Guardrails: invalid actions are blocked by design
Nothing happens "magically". Every step is visible, repeatable, and explainable. That is exactly what engineers expect from software they trust.
8.3 Transferability: beyond ETABS
Although ETABS was used as the concrete example, nothing in this architecture is ETABS-specific. The same pattern applies to SAP2000, SAFE, other CSI products, and any commercial FE tool exposing an API or automation layer.
Even beyond FE software, the structure transfers to pre-processing tools, post-processing dashboards, automated checking utilities, and internal design applications.
The solver changes. The pattern does not.
8.4 From script to product: the real shift
The most important transition shown in this case study is not technical — it is conceptual. We moved from:
I have a script that helps me
to:
I have a tool that enforces a workflow
This shift is what enables consistency across projects, reuse across teams, and confidence in the results produced. Python and PyQt make this transition surprisingly accessible to engineers who are willing to think beyond one-off automation.
9 Closing thoughts
Custom engineering tools do not replace commercial FE software. They amplify it by combining:
- Python for orchestration,
- PyQt for professional user interaction,
- and a clean interface to commercial solvers,
Engineers can build tools that reflect how they actually work, rather than forcing their workflow into generic interfaces. This case study is only one example, but the approach is broadly applicable. What part of your daily routine could be improved or streamlined with a well-thought-out custom tool?

Featured Tutorials and Guides
If you found this tutorial helpful, you might enjoy some of these other tutorials.
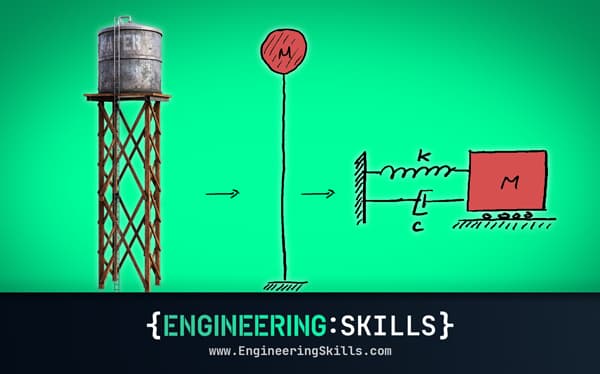
Understanding Structural Dynamics and Inertia
How and why dynamic analysis is performed instead of simpler static analysis

Dr Seán Carroll