Finite Element Analysis of Plate and Shell Structures: Part 2 - Shells
Expanding from plate to shell elements - build a workflow that unlocks the behaviour of 3D shell structures
- You will understand how we make the leap from Reissner-Mindlin plate elements to shell elements and what extra modelling fidelity that provides.
- You will be comfortable using a combination of GMSH and the open-source 3D modelling software, Blender, to generate custom finite element meshes.
- You will be able to use OpenSeesPy to model shell structures, as an alternative to your own custom finite element solver.
- You will have a much greater understanding of what commercial finite element packages are doing, behind the UI, allowing you to authoritatively interrogate their results.
In this course, we expand on our previous study of plate elements and explore Reissner-Mindlin shell elements. This will allow us to take the versatile solver we built in part 1 and upgrade it to handle the analysis of thick and thin shell elements through the inclusion of membrane stresses.
We’ve studied analytical techniques for the analysis of shells of revolution in our Analytical Modelling of Shells course. This gave us a sound understanding of some of the foundational mathematical models developed for the analysis of shell structures.
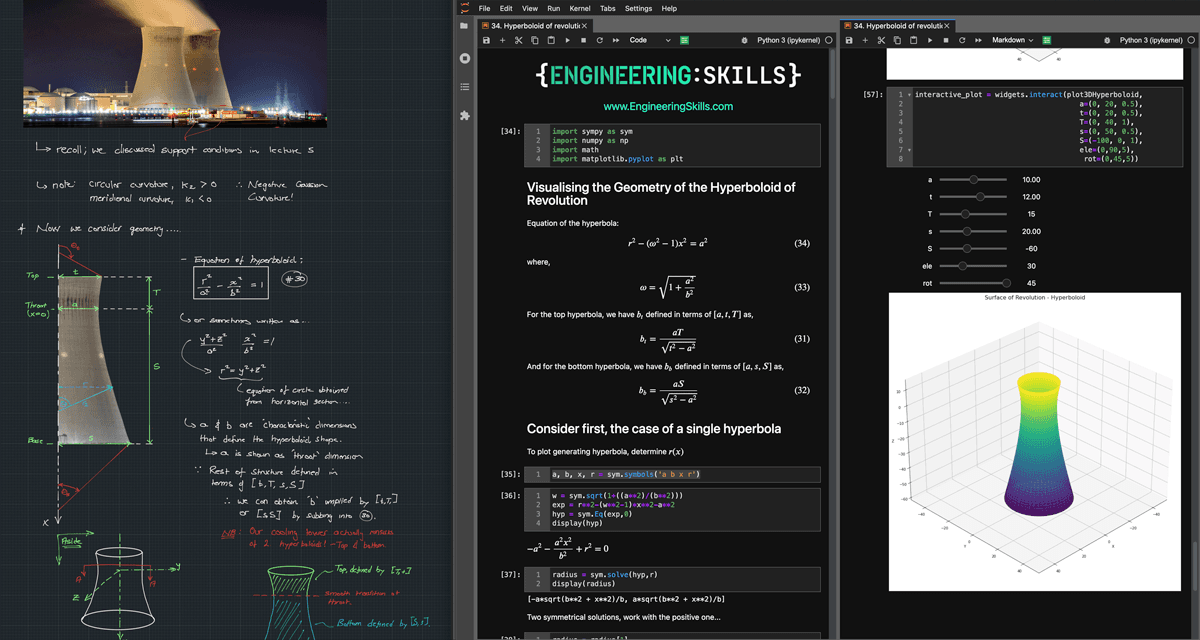
Analytical modelling of a hyperboloid shell using thin plate membrane theory.
However, much of that work relied on the simplifying assumption that our shell structures developed membrane forces exclusively and that bending was completely absent in the structure. While this makes the modelling a little more approachable, it severely limits the applicability of the modelling techniques since most real-world structures will develop a combination of flexural and membrane stresses in response to loading.
In this course, we’re taking a numerical approach to the problem that frees us from these limiting assumptions. By giving our mechanical modelling the ‘finite element’ treatment, we can develop much more versatile tools for modelling shell behaviour. This means that we can start to work with more realistic loading scenarios and model the development of combined bending and membrane action within the structure.

Finite element analysis of a hyperboloid capturing both membrane and bending behaviour.
In addition to building and validating our own implementation of the Reissner-Mindlin shell model, we’ll also take the time to familiarise ourselves with some existing open-source tools for both analysis (OpenSeesPy) and mesh generation (Blender and GMSH). So, you’ll complete this course...
- with a solid understanding of the underlying theory,
- having proven your understanding by using it to build a working finite element code (that works for thick and thin plate and shell elements),
- with the ability to use powerful open-source tools for finite element analysis.
Our goal in this course is not to replace your current commercial finite element analysis software. The primary objective is to build your understanding of the underlying mechanics and how that maps to finite element modelling. That said, having the ability to build your own FE models and run analyses with nothing more than some Python code is a nice bonus!
Course Breakdown
This course is being released section by section; as each new section is completed, I’ll be pushing those lectures live inside the course. The course index (on this page) shows the currently available lectures.
The first six sections of the course are currently available.
Section 1: Expanding the mechanics for flat shell elements
In the first section of the course, we focus on the theory and extending it from a plate to a shell model. This means we introduce membrane behaviour into our mechanical model. The aim of this section is to build up all of the necessary foundational knowledge required to underpin the equation for the element stiffness matrix - the backbone of our entire solver.
Section 2: Building the shell element stiffness matrix
In section 2, we'll consolidate what we covered in section one by writing a Python function that will calculate our local element stiffness matrix. Much of this section will be familiar if you’ve completed the part 1 course on plates. The inclusion of a membrane stiffness contribution to the element stiffness matrix will be new ground for everyone.
Section 3: Building the transformation matrix
In the third section, we focus on building the transformation matrix required to map our element stiffness from a local to a global reference frame. This is essential for combining element stiffness matrices into a global structure stiffness matrix. The modelling of 3-dimensional shell structures containing finite elements at different orientations in space makes this a critical section for our advancement from 2D plates to 3D shells.

Calculating the element transformation matrix.
Section 4: Building a complete shell element solver
In section 4, we'll take these building blocks, the element stiffness and transformation matrices, and build out the first complete version of our shell finite element solver. We're not too concerned with building interesting or complex shell geometries at this stage. For now, the focus is on wiring together the fundamental pieces of our finite element analysis pipeline and applying it to a procedurally generated structural mesh.

Procedurally generated shell mesh.
Section 5: Building an OpenSeesPy Shell for comparison
In section 5, we shift our focus to validation. It’s critical that, having just implemented a new analysis code, we take the time to validate its output before we move on. We’ll compare the output from our solver to an equivalent model that uses OpenSeesPy as the analysis engine. In addition to validating our custom code, you'll also build a second analysis pipeline that uses OpenSeesPy - a powerful tool that you can deploy on future projects.
Section 6: Drilling degrees of freedom and singularity
Our validation exercise in section five surfaces a tricky reliability issue with our code. For some input parameters, we observe excellent agreement between our custom code and OpenSeesPy benchmark. However, in some cases, relatively minor changes to our input parameters lead to nonsensical output.
In section 6, we’ll spend time digging into the source of the problem and implementing a fix. When you complete this section, you’ll have a much better understanding of the causes and implications of a singular stiffness matrix…something you’re bound to come across when working on stiffness-based analyses.
🚧 Section 7: Reduced shear and membrane strain fields
In section 7, we'll dig deeper and look at some other limitations of the current iteration of our shell solver. We'll explore the concept of reduced shear and membrane strain fields and how they can be used to improve the accuracy of our analysis.
🚧 Section 8: Generating shell geometry
In the previous sections, we focused on using our shell solver to analyse quite simple geometries. But, just like our plate analysis in part 1, we’ll want to deploy our code on more complex geometries. So in section 8, we’ll explore different techniques for modelling and meshing shell structures and piping those meshes into our custom solver code.
By the time you've completed the course, you will have developed two parallel analysis pipelines, one that uses your own custom solver and a second that uses one of the best open-source libraries available today. In addition, you’ll have various strategies for turning complex geometry into finite element-ready meshes that can be processed in either pipeline.
Who is this course for?
- Engineers and student engineers that want to build a deeper understanding of the mechanics of shell structures and membrane behaviour.
- Engineers that want to leverage the power of Python and in particular open-source tools for complex structural analysis.
- Anyone who has completed Finite Element Analysis of Plate and Shell Structures: Part 1 - Plates and wants to expand on what was covered in that course.
Note that certificates of completion will be available for download when the full course is published.

Download your personalised Certificate of Completion once you’ve finished all course lectures.
Applying for jobs? Use your Certificate of Completion to show prospective employers what you’ve been doing to improve your capabilities.
Independently completing an online course is an achievement. Let people know about it by posting your Certificate of Completion on your Linkedin profile or workplace CPD portfolio.