Welcome to the course! In this first lecture, I want to:
- Briefly set out our objectives in the course,
- Set your expectations for what you will achieve by completing the course,
- Give you a sense of the roadmap ahead.
We’re going to cover a lot in this course, not just in terms of the core theory, but I also want you to have developed a range of practical skills by the time you complete the course.
In broad terms, this course will walk you through how to build your own custom finite element code for the analysis of plate and shell structures. Building your own solver allows you to take the theory that we cover and prove to yourself that you understand it. When we validate our solver output, we also prove that all of the theory on which it was built is sound and fully understood.
3 levels of depth
You can think of this course as having 3 layers of depth, and depending on your starting point, you can choose which degree of depth you want to work at.
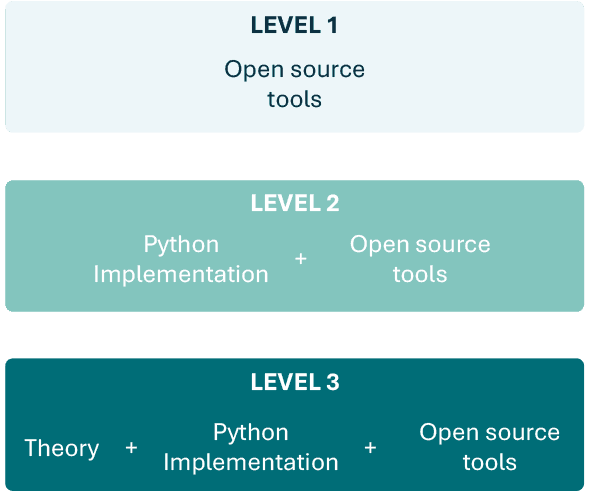
Fig 1. The three levels of depth that the course can be completed at.
Level 3 - I want the full picture
If you want to fully understand everything from the core mechanics to how to implement this in Python and also how to validate that code against open-source tools, that would be the deepest level of understanding, let’s call that level 3. This will require you to work through all sections of the course. Obviously, this is what I would recommend if you have the time.
Level 2 - Let’s just get building
If you’re not too fussed about the underlying theory or in other words, if you’re already familiar with it and just want to learn how to implement it in Python and validate it using open-source libraries, then that’s level 2. I’ve structured the course so that you can skip certain theory-heavy sections and still achieve your desired outcome.
Level 1 - Just show me the open source tools
Finally, if you’re only interested in how we can build analysis workflows using open-source libraries such as GMSH, OpenSeesPy and Pynite, that corresponds to level 1. This can be achieved by completing even fewer sections of the course.
I’ll outline below which sections are required for each desired outcome. So, let’s take a closer look at each section in turn.
Course overview
In addition to the course being structured according to the levels of depth described above, you can also think about the course as being split into two halves. In the first half, we focus on plate elements and the modelling and analysis of structures that consist of plate elements. In the second half, we expand all of this to flat shell elements.
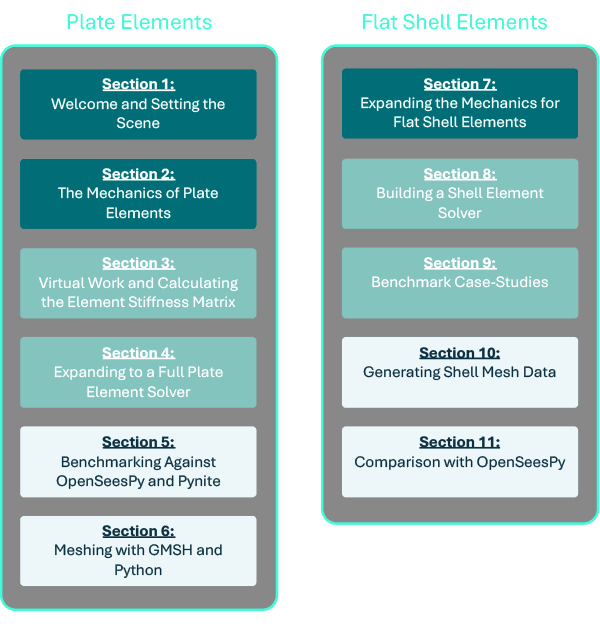
Fig 2. The course is split into two halves, the first half focuses on plate elements and the second half focuses on flat shell elements.
Section 1: Welcome and Setting the Scene
In this first section, we’re establishing the overall aim of the course and covering some housekeeping issues like how to get help, how we think about pre-requisite knowledge and giving a high-level introduction to Reissner-Mindlin theory and why it’s at the heart of the course. This is recommended for everyone taking the course.
Section 2: The Mechanics of Plate Elements
We get into the core mechanics in section 2. In this section, we work through Reissner-Mindlin plate elements and build up the core equations required to establish the element stiffness matrix - the fundamental building block of our solver. This section is recommended for those who want the full picture (level 3).
Section 3: Virtual Work and Calculating the Element Stiffness Matrix
In section 3, we’ll initially focus on how the principle of virtual work leads us to the equations for the element stiffness matrix and equivalent force vector for the element.
After that, we briefly review the Gauss quadrature numerical integration technique we’ll use to calculate the element stiffness matrix and equivalent force vector. We’ll also work through how this calculation is implemented in Python.
Lectures 14 to 16 (virtual work & Gauss quadrature) are useful for a level 3 understanding. The rest of the section is required for a level 2 (build your own solver) approach.
Section 4: Expanding to a Full Plate Element Solver
In section 4, we take what we implemented on a single element level in the previous section and expand it to build a solver for a rectangular plate consisting of multiple elements. This is our first big coding section where we implement a complete plate solver from scratch. If you’re pursuing levels 1 and 2, you’ll want to focus on this section. Level 3 folks can gloss over this section.
Section 5: Benchmarking against OpenSeesPy and Pynite
In section 5, we validate the output from our custom solver against equivalent structural models built with both OpenSeesPy and Pynite. Validating our code against these open-source libraries is critical at this early stage and will allow us to move forward with more confidence in our work. It will also surface a really interesting phenomenon known as shear-locking, which we’ll need to tackle early on. Section 5 is the first mandatory section for a level-1-focused (open-source tools) approach.
Section 6: Meshing with GMSH and Python
So far, all of our plate analysis has been on rectangular plates that consist of rectangular elements. In reality, we’ll need to be able to analyse plates of all shapes and sizes. To do this, we’ll need a way of generating finite element meshes. This can be quite a complex pre-process step. To help us out here, we’ll introduce GMSH in section 6.
This is another incredibly powerful and versatile open-source library that will do a lot of the heavy lifting for us. Our aim in this section is to build the pre-processing meshing step into the analysis pipelines for both our custom FE solver and our validation workflows that use OpenSeesPy and Pynite.
Again, section 6 should be completed by anyone interested in open-source tools - levels 1, 2 and especially 3.
Section 7: Expanding the Mechanics for Flat Shell Elements
At this stage in the course, we’ll have an excellent theoretical and practical understanding of how to analyse plate structures. Now it’s time to turn our attention to Reissner-Mindlin shell elements.
The good news is that we have most of the hard theoretical work done already with our study of plate elements. To expand to shell elements is relatively straightforward. So, in 7, we’ll extend our theoretical underpinning to flat shell elements. Again, if you don’t require this theoretical background (level 1), feel free to skip this section.
Section 8: Building a Shell Element Solver
In section 8, we’ll extend and modify our plate analysis code to handle structures that consist of flat shell elements. Again, the tricky work is behind us at this stage and adapting our plate code for shell elements is relatively easy. The output from section 8 is a custom finite element solver for shell structures that resist both in-plane and out-of-plane actions. This section should be completed for levels 1 and 2.
Section 9: Benchmark Case-Studies
In section 9, we shift our focus back to validation and use our new shell solver to analyse some simple validation case studies. Again, it’s critical that, having just implemented a new analysis code, we take the time to validate its output before we move on. By the end of section 9, we’ll be confident to push our solver to analyse more complex and interesting geometries. Section 9 should also be completed for levels 1 and 2.
Section 10: Generating shell mesh data
In the previous sections, we focused on using our shell solver to analyse quite simple shell geometry. But, just like our plate analysis earlier, we’ll want to deploy our analysis code on more complex geometries.
So in section 10, we’ll explore different techniques for modelling shell structures and meshing the resulting surfaces so we end up with a mesh that our solver can process. This one should be completed for all levels.
Section 11: Comparison with OpenSeesPy
Finally, in Section 11, we’ll again perform a validation exercise, comparing the output from our solver to an equivalent model that uses OpenSeesPy as the analysis engine. At this point, you’ll have an excellent grasp of how to handle the analysis of plate and shell structures and will have two parallel analysis pipelines, one that uses your own custom solver backed by a clear understanding of the theory and a second pipeline that uses some of the best open-source libraries available today. In addition, you’ll also have various strategies for turning basic geometry into finite element-ready meshes that can be processed in either pipeline. This section is also for all levels.
Now that you have a good idea of the roadmap ahead, in the next lecture, I’ll take a few minutes to address some of the questions you might still have around course prerequisites and the level of Python required to complete the course.